- Home
- Documentation
- Community
- Projects
- Boards
- Agilex 5 SoC
- Agilex 7 SoC
- Arria 10 SoC
- Nallatech 385A - Arria 10 FPGA Network Accelerator Card
- Nallatech 385A-SoC Accelerator Card with Arria 10 FPGA
- ALARIC Instant DevKit ARRIA 10 SoC FMC IDK by REFLEX CES
- Altera Arria 10 SoC Virtual Platform
- Altera Arria 10 SoC Board
- Nallatech 510T compute acceleration card with Intel Arria 10 FPGA
- REFLEX CES Achilles Arria 10 SoC SOM
- Terasic Arria10 SoC Board : HAN Pilot Platform
- Arria V SoC
- Cyclone V SoC
- Altera Cyclone V SoC Board
- Arrow SoCKit User Manual - July 2017 Edition
- Arrow SoCKit User Manual - November 2019 Edition
- Arrow SoCKit Evaluation Board
- Atlas-SoC Development Platform
- Critical Link MitySOM-5CSx Development Kit
- Cyclone V Ethernet driver problems
- DE10-Nano Development Board
- Terasic DE10-Standard Development Kit
- Devboards DBM-SoC1 module
- Devboards DBM-SoC2 module
- EBV SoCrates Evaluation Board
- Enclustra Mercury SA1 SoC Module
- Enterpoint Drigmorn 5
- Enterpoint Larg 2
- Altera Cyclone V SoC Development Platform
- Mpression Helio SoC Evaluation Kit by Macnica
- Mpression Sodia Evaluation Board by Macnica
- ARIES Embedded - MCV System on Module
- Mpression Borax SOM Module and Development Kit by Macnica
- Enterpoint Mulldonoch 3
- Networked Pro-Audio FPGA SoC Development Kit by Coveloz
- NOVPEK™CVLite
- NOVSOM®CV
- NOVSOM®CVLite
- NovTech IoT Octopus™
- NovTech NetLeap™
- Enterpoint Raggedstone 4
- Solectrix SMARC compliant System-on-Module
- Terasic DE1-SoC Development and Education Board
- Stratix 10 SoC
- Find a Board
- News
This page describes the some of the use cases that can be exercised for the Intel Agilex® 5 E-Series virtual platform for the Intel Simics Simulator for Intel® FPGAs
- Overview
- Release Content
- Intel Agilex® 5 E-Series Simics Virtual Platform - Universal
- Main Features Supported by the Intel Agilex 5 E-Series Universal Virtual Platform
- Configurable Parameters in the Intel Agilex® 5 E-Series Universal Virtual Platform
- Use Cases Supported by the Intel Agilex® 5 E-Series Universal Virtual Platform
- Simulation Setup
- Use Case: Exercise SDCard Boot Flow from FSBL to Linux
- Use Case: Exercise Hello Application
- Use Case: Exercise System Check Application with HPS LED Turn On/Off control
- Use Case: Access the Web Server Application from Host PC
- Use Case: Access ON-Chip RAM in FPGA Example Design from Linux Prompt
- Use Case: Excercise Peripheral Components in FPGA Fabric Example Design
- Use Case: Exercise USB Disk Hot-Plug
- Use Case: Exercise UBIFS QSPI Boot Flow from FSBL to Linux
- Use Case: Exercise NAND Boot Flow from FSBL to Linux
- Use Case: Debug Bare-Metal Code Using Intel Simics Simulator
- Use Case: Debug Bare-metal Code Using Simics-RiscFree
- Use Case: Remote Debugging of a Linux User Mode Program Using ARM DS Debugger
Overview
Intel Agilex® 5 E-Series devices provide the next-generation hard processor system (HPS) after those provided with the Intel Agilex® 7 and Intel® Stratix® 10 SoC FPGA devices. Intel Agilex 5 E-Series devices support new features, such as TSN, USB 3.1 Gen 1, and I3C.
The Intel Agilex 5 E-Series HPS application processors can run Linux or an RTOS, such as Zephyr*, with a scalable performance using one to four Arm* Cortex*-A cores with variable frequencies that allow for a wide range of applications. The Intel Agilex 5 E-Series Simics virtual platform models the HPS processor with two Arm Cortex-A55 cores, two Arm Cortex-A76 cores, and HPS peripherals. The Intel Agilex 5 E-Series HPS virtual platform is released as part of the Simics® Simulator for Intel® FPGAs software, which also includes several virtual platforms where the Intel Agilex 5 E-Series device is instantiated, emulating the concept of having different versions of a development kit or daughter cards. The Intel Agilex 5 E-Series has the following supported virtual platforms:- Intel Agilex 5 E-Series Virtual Platform - Universal
Page History
- 23.2 Last revision: 418
- 23.3 Last revision: 536
- 23.4 Last revision: 544
Prerequisites
To exercise the instructions presented on this page (build your binaries and exercise the use cases), your system must satisfy the following prerequisites:- Host PC with Linux OS. (Note: Instructions on this page use Ubuntu 22.04 LTS.)
- The following packages are needed to deploy the Simics project:
- GCC 6.3 compiler or higher
- g++ 9.4 or higher
- GNU make 4.1 or higher
- Local Ethernet network with DHCP server (provides IP address to the board).
- Intel Simics Simulator for Intel FPGAs installed.
- Intel Agilex 5 Virtual Platform components available to be deployed.
- For binaries building instructions, see Build Instructions.
- For installation instructions for the Intel Simics Simulator for Intel FPGAs and the Intel Agilex 5 E-Series virtual platforms, refer to the following documents:
- U-Boot, Linux compilation, Yocto compilation, and the creation of an SD card image require a Linux host PC.
To create these binaries, the toolchain and other software required need to be downloaded. This is described as part of the instructions in each section.
- The Intel Simics Simulator for Intel® FPGAs is available only for Linux systems.
- In case any use case requires additional prerequisites, these are listed as part of the use case description.
- When using 24.1 Simics release and you have already a project available from a previous release, this project needs to be redeployed due to a change in the Universal Virtual Platform target script in which the ethernet interface eth2 is used instead of the original one eth0. Alternatively, you can do this update manually in the target script of your current project.
Release Content
Version: 24.1| SW Component | Repository | Branch/TAG/Version |
|---|---|---|
| U-Boot | https://github.com/altera-opensource/u-boot-socfpga | v2023.10/QPDS24.1_REL_GSRD_PR/ 69d5338be07fba0c7c94579f38cc3c4014d1d355 |
| ATF | https://github.com/altera-opensource/arm-trusted-firmware | v2.10.0/QPDS24.1_REL_GSRD_PR/ afecefc0f3cf570cea101fd3a07ad2c58499b485 |
| Linux | https://github.com/altera-opensource/linux-socfpga | v6.1.55/QPDS24.1_REL_GSRD_PR/ f264269ae03e89252b7b6ab3907d2cdf162c21c1 |
| Reference Design Sources | https://github.com/altera-opensource/meta-intel-fpga-refdes | nanbield(4.3)/QPDS24.1_REL_GSRD_PR/ 43fcc7bafa082e49310b20c14ad35065d0734217 |
| GSRD | https://github.com/altera-opensource/gsrd-socfpga | nanbield |
| Yocto Project | https://git.yoctoproject.org/poky | nanbield(4.3)/ 7459fda0822eeaefda39170ec9f6bbe74491b39f |
| Reference Design Recipes | https://git.yoctoproject.org/meta-intel-fpga | nanbield(4.3)/QPDS24.1_REL_GSRD_PR/ b843453737149ef9fcc48b90be86dd2e275aab13 |
| Arm Debugger | http://fpgasoftware.intel.com/armds | ARM DS 2022.2 |
| Ashling RiscFree | https://www.intel.com/content/www/us/en/software-kit/819137/intel-quartus-prime-pro-edition-design-software-version-24-1-b115-for-linux.html Additional Software/Stand-Alone Software tab |
24.1 |
Prebuilt Binaries
You can find the prebuilt binaries from the GSRD prebuilt at the following URL: https://releases.rocketboards.org/2024.04/gsrd/agilex5/ . The files in this folder allow you to boot directly from SDCard. It also contains some of the files that are used to generate the final images used to boot from QSPI and from NAND. The following folders contain the remaining files used by the recipes to create the binaries to boot from QSPI and NAND.- QSPI: QSPI boot complement files. Here is the link to obtain the uboot_script.its file which is also needed.
- NAND: NAND boot complement files.
Note: Starting on 24.1 release, the pre-built binaries created are targeted for silicon. In 24.1 release these binaries can not be used directly with Simics simulator, so these required to be patched so they use the correct device tree that applies for Simics. To do this please refer to Converting binaries created for silicon to be used for Simics section.
Embedded Software Peripheral Linux Drivers Availability
| HPS Peripheral | Supported |
|---|---|
| eMMC/SDCard & Combo Phy Controllers | Yes |
| DMA Controller | Yes |
| XGMAC Ethernet Controller | Yes |
| USB 3.1 Gen1 Controller | Yes |
| USB 2.0 Controller | Yes |
| GPIO Controller | Yes |
| I2C Controller Initiator/Target | Yes |
| SPI Controller Initiator/Target | Yes |
| I3C Controller Initiator | Yes |
| I3C Controller Target | Yes |
| NAND Controller & Combo PHY Controller | Yes |
| APB Timer | Yes |
| QSPI Controller | Yes |
| GICv3 Interrupt controller | Yes |
| EDAC RAS Driver | Yes |
| Clock manager | Yes |
| Reset manager | Yes |
| UART | Yes |
| WatchDog timer | Yes |
| System manager | Yes |
| SVC SOC FPGA manager | Yes |
| SVC FPGA firmware | Yes |
| SMMU | Yes |
| SVC FCS Crypto | Yes |
| SVC HWMON | Yes |
| SVC RSU | Yes |
| CVP | Yes |
| PMU | No |
Build Instructions
The following diagram illustrates the full-build flow for the binaries used with the Intel Simics simulator. The build flow utilizes the source code placed in GitHub repositories and uses a flow based on Yocto.Note: Starting on 24.1 release, the build flow is targeted to create binaries for silicon instead of Simics. To create the binaries targeted for Simics virtual platform, this build flow has been patched with the step 3 in the Customize the Yocto Build section. This patch consists of replacing in the kernel.itb the Linux device tree used for silicon with the one that applies to Simics. This binary deviation between Simics and silicon is expected to be addressed in 24.2 release, so one single build flow will apply for both.
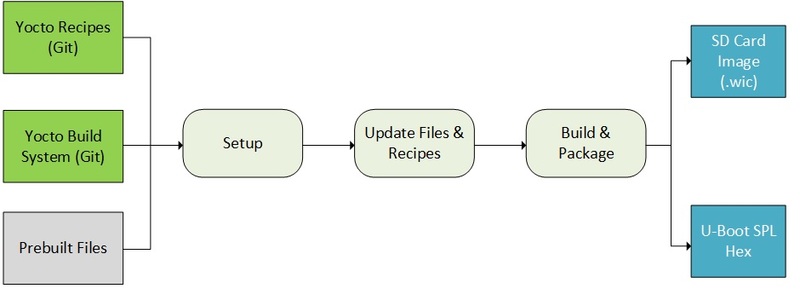 The build flow creates the binaries following the flow from Single Boot Image described at https://rocketboards.org/foswiki/Documentation/SingleImageBoot.
Set Up the Environment
sudo rm -rf agilex5_gsrd
mkdir agilex5_gsrd
cd agilex5_gsrd
export TOP_FOLDER=$(pwd)
Download the compiler toolchain. Define environment variables so that the toolchain can be used to build the binaries:
cd $TOP_FOLDER
wget https://developer.arm.com/-/media/Files/downloads/gnu/11.2-2022.02/binrel/gcc-arm-11.2-2022.02-x86_64-aarch64-none-linux-gnu.tar.xz
tar xf gcc-arm-11.2-2022.02-x86_64-aarch64-none-linux-gnu.tar.xz
rm -f gcc-arm-11.2-2022.02-x86_64-aarch64-none-linux-gnu.tar.xz
export PATH=`pwd`/gcc-arm-11.2-2022.02-x86_64-aarch64-none-linux-gnu/bin:$PATH
export ARCH=arm64
export CROSS_COMPILE=aarch64-none-linux-gnu-
Set Up the Yocto Build System
1. Ensure your system satisfies the Yocto system requirements provided at https://docs.yoctoproject.org/3.4.1/ref-manual/system-requirements.html#supported-linux-distributions. Use the following commands to install required packages on Ubuntu 22.04:sudo apt-get update sudo apt-get upgrade sudo apt-get install openssh-server mc libgmp3-dev libmpc-dev gawk wget git diffstat unzip texinfo gcc\ build-essential chrpath socat cpio python3 python3-pip python3-pexpect xz-utils debianutils iputils-ping\ python3-git python3-jinja2 libegl1-mesa libsdl1.2-dev pylint3 xterm python3-subunit mesa-common-dev zstd\ liblz4-tool git fakeroot build-essential ncurses-dev xz-utils libssl-dev bc flex libelf-dev bison xinetd\ tftpd tftp nfs-kernel-server libncurses5 libc6-i386 libstdc++6:i386 libgcc++1:i386 lib32z1\ device-tree-compiler curl mtd-utils mtd-tools u-boot-tools net-tools swig -yOn Ubuntu 22.04, point the /bin/sh to /bin/bash, as the default is a link to /bin/dash:
sudo ln -sf /bin/bash /bin/shNote: You can also use Docker containers to build the Yocto recipes. Refer to https://rocketboards.org/foswiki/Documentation/DockerYoctoBuild for details. When using a Docker container, it does not matter what Linux distribution or packages you have installed on your host, as all dependencies are provided by the Docker container. 2. Clone the Yocto script and prepare the build:
cd $TOP_FOLDER rm -rf gsrd-socfpga git clone -b nanbield https://github.com/altera-opensource/gsrd-socfpga cd gsrd-socfpga . agilex5_devkit-gsrd-build.sh build_setupNote: Run the following commands to set up the yocto build environments again, if you closed the current window (for example, when rebooting the Linux host) and want to resume the next steps:
cd $TOP_FOLDER/gsrd-socfpga
. ./poky/oe-init-build-env agilex5_devkit-gsrd-rootfs/
Customize the Yocto Build
1. (Optional) Change the following files ingsrd-socfpga/meta-intel-fpga-refdes/recipes-bsp/u-boot/files/: - uboot.txt - distroboot script
- uboot_script.its -
itsfile for creating FIT image from the above script
gsrd-socfpga/meta-intel-fpga-refdes/recipes-kernel/linux/linux-socfpga-lts: - fit_kernel_agilex5.its -
itsfile for creating thekernel.itbimage, which by default contains the following:- Kernel
- Distroboot boot script
- Device tree configurations
- Board configurations
# Update its file to replace the device tree to be used in kerne.itb
cd $TOP_FOLDER/gsrd-socfpga
sed -i "s/socfpga_socdk_vanilla/socfpga_socdk/g" meta-intel-fpga-refdes/recipes-kernel/linux/linux-socfpga-lts/fit_kernel_agilex5_devkit.its
sed -i "s/socfpga_agilex5_vanilla\.dtb/socfpga_agilex5_socdk_swvp\.dtb/g" meta-intel-fpga-refdes/recipes-kernel/linux/linux-socfpga-lts/fit_kernel_agilex5_devkit.its

# Add the device tree used to Simics to the build flow so we can get the corresponding .dtb file
SEARCHLINE="if \[\[ \"\${MACHINE}\" == \*\\\"agilex5_\"\* \]\]; then"
ADDLINE="cp \${STAGING_KERNEL_DIR}/arch/\${ARCH}/boot/dts/intel/socfpga_agilex5_socdk_swvp.dts \${WORKDIR}/socfpga_agilex5_socdk_swvp.dts"
sed -i "/$SEARCHLINE/a $ADDLINE" meta-intel-fpga-refdes/recipes-bsp/device-tree/device-tree.bb

# Replace the copy of the vanilla dtb used in silicon to copy the dtb file used in Simics
SEARCHLINE="cp \${DTBDEPLOYDIR}\/socfpga_agilex5_vanilla.dtb \${B}"
REPLACELINE="cp \${LINUXDEPLOYDIR}\/..\/..\/..\/..\/..\/deploy\/images\/agilex5_devkit\/devicetree\/socfpga_agilex5_socdk_swvp.dtb \${B}"
sed -i "s/$SEARCHLINE/$REPLACELINE/g"  meta-intel-fpga-refdes/recipes-kernel/linux/linux-socfpga-lts_%.bbappend
Build Yocto
Build Yocto:bitbake_imageGather files:
packageAfter the build is completed successfully, the following two folders are created:
-
agilex5_devkit-gsrd-rootfs: area used by OpenEmbedded build system for builds. For the description of the build directory structure, refer to https://docs.yoctoproject.org/ref-manual/structure.html#the-build-directory-build. -
agilex5_devkit-gsrd-images: the build script copies here are relevant files built by Yocto from theagilex5_devkit-gsrd-rootfs/tmp/deploy/images/agilex5folder. It also includes other relevant files.
$TOP_FOLDER/gsrd-socfpga/agilex5_devkit-gsrd-images folder are:
| File | Description | SD Card Boot | QSPI Boot | NAND Boot |
|---|---|---|---|---|
| u-boot-agilex5_devkit-socdk-gsrd-atf/u-boot-spl-dtb.bin | U-Boot SPL binary file | * | * | * |
| u-boot.itb | U-Boot (SSBL) | * | * | * |
| boot.scr.uimg | Distroboot boot script | * | * | |
| kernel.itb | Linux kernel fit image | * | * | * |
| console-image-minimal-agilex5_devkit_nand.ubifs | File system for NAND boot | * | ||
| console-image-minimal-agilex5_devkit_nor.ubifs | File system for QSPI boot | * | ||
| gsrd-console-image-agilex5_devkit.wic | SD Card Image | * | ||
| uboot.txt | U-Boot Distroboot script | * | ||
| uboot_script.its | ITS file to create FIT binary of U-Boot Distroboot script | * |
Build QSPI Boot Image
The next step consists of creating the QSPI image with UBIFS format that will be used by in the simulation that exercises this use case. To build this image the same binaries generated from the GSRD build are used. The layout of the QSPI image is shown in the following table:| MTD Partition | UBI Volume | Volume Name | Type | Image/File | Start Addr | Size | |
|---|---|---|---|---|---|---|---|
| 0 (qspi_bootinfo) | N/A | N/A | RAW | Bootinfo (Empty) | 0x0 | 2MB | |
| 1 (qspi_uboot) | N/A | N/A | RAW | bitstream (FPGA image, SDM firmware) | 0x00200000 | ~1 MB | |
| N/A | N/A | RAW | u-boot.itb | 0x04000000 | Auto | ||
| 2 (qspi_root) | 0 | env | UBI | u-boot.env | root.ubi | 0x4200000 | 256KB |
| 1 | script | UBI | u-boot.scr | Auto | 128KB | ||
| 2 | kernel | UBI | kernel.itb | Auto | 24MB | ||
| 3 | dtb | UBI | kernel.dtb | Auto | 256KB | ||
| 4 | rootfs | UBIFS | rootfs.ubifs | Auto | 160MB | ||
cd $TOP_FOLDER
rm -rf qspi-bin && mkdir qspi-bin && cd qspi-bin
ln -s $TOP_FOLDER/gsrd-socfpga/agilex5_devkit-gsrd-images/u-boot-agilex5_devkit-socdk-gsrd-atf/u-boot.itb u-boot-itb.bin
ln -s $TOP_FOLDER/gsrd-socfpga/agilex5_devkit-gsrd-images/u-boot-agilex5_devkit-socdk-gsrd-atf/u-boot-spl-dtb.bin
ln -s $TOP_FOLDER/gsrd-socfpga/agilex5_devkit-gsrd-images/kernel.itb kernel-image
ln -s $TOP_FOLDER/gsrd-socfpga/agilex5_devkit-gsrd-images/console-image-minimal-agilex5_devkit_nor.ubifs  rootfs.ubifs
ln -s $TOP_FOLDER/gsrd-socfpga/meta-intel-fpga-refdes/recipes-bsp/u-boot/files/uboot_script.its uboot_script.its
cp $TOP_FOLDER/gsrd-socfpga/meta-intel-fpga-refdes/recipes-bsp/u-boot/files/uboot.txt .
2. Get from this page the following files:
cd $TOP_FOLDER/qspi-bin
wget https://www.rocketboards.org/foswiki/pub/Documentation/Agilex5SoCSimicsVirtualPlatformsReferenceGuide/agilex5_flash_image.pfg
wget https://www.rocketboards.org/foswiki/pub/Documentation/Agilex5SoCSimicsVirtualPlatformsReferenceGuide/agilex5_factory.sof
Note: The agilex5_factory.sof file is actually an Agilex 7 SOF file, since in 24.1 release an Agilex 5 GHRD doesn't exist yet. 3. Create UBI configuration file for the rootfs partition:
cd $TOP_FOLDER/qspi-bin
cat <<EOT >ubinize_nor.cfg
[env]
mode=ubi
vol_id=0
vol_name=env
vol_size=256KiB
vol_type=dynamic

[script]
mode=ubi
image=boot.scr.uimg
vol_id=1
vol_name=script
vol_size=128KiB
vol_type=dynamic

[kernel]
mode=ubi
image=kernel-image
vol_id=2
vol_name=kernel
vol_size=24MiB
vol_type=dynamic

[dtb]
mode=ubi
vol_id=3
vol_name=dtb
vol_size=256KiB
vol_type=dynamic

[rootfs]
mode=ubi
image=rootfs.ubifs
vol_id=4
vol_name=rootfs
vol_type=dynamic
vol_size=160MiB
vol_flag=autoresize
EOT
The following file is created:
- $TOP_FOLDER/qspi-bin/ubinize_nor.cfg
Note: ubi.mtd=3 is for QSPI, and Linux is using mtd3 partition as a disk for R/W.
Once the file is updated, use mkimage tool with the uboot_script.its ITS file to create images the FIT image corresponding to the U-Boot distroboot script. Using mkimage tool to create images for use with U-Boot bootloader. The uboot_script.its is an image tree source file that describes the structure and content of the FIT image:
sed -i "s/ubi.mtd=1 /ubi.mtd=3 /"  uboot.txt
mkimage -f uboot_script.its boot.scr.uimg
The following file is created:
- $TOP_FOLDER/qspi-bin/boot.scr.uimg
Once the root.ubi files is created this is renamed as hps.bin.
Required files for this step: ubinize_nor.cfg, boot.scr.uimg, kernel-image, rootfs.ubifs
ubinize -o root.ubi -p 65536 -m 1 -s 1 ubinize_nor.cfg
mv root.ubi hps.bin
The following file is created:
- $TOP_FOLDER/qspi-bin/hps.bin
aarch64-none-linux-gnu-objcopy -I binary -O ihex --change-addresses 0xffe00000 u-boot-spl-dtb.bin u-boot-spl.hexThe following file is created:
- $TOP_FOLDER/qspi-bin/u-boot-spl.hex
Note: Make sure the filenames are specified correctly in agilex5_flash_image.pfg Run the Quartus File Generator command below to generate an RPD file:
~/intelFPGA_pro/24.1/niosv/bin/niosv-shell <<< "quartus_pfg -c agilex5_flash_image.pfg"
The following file is created: - $TOP_FOLDER/qspi-bin/flash_image_jic.rpd
Build NAND Boot Image
The next step consists of creating the NAND image that will be used by in the simulation that exercises this use case. For this, the NAND image will have the layout shown in the following figure:| MTD Partition | UBI Volume | Volume Name | Type | Image/File | Flash Offset | Size | Size in Hex | |
|---|---|---|---|---|---|---|---|---|
| 0 (u-boot) | N/A | N/A | RAW | u-boot.itb | 0x00000000 | 2MB | 0x00200000 | |
| 1 (root) | 0 | env | UBI | u-boot.env | root.ubi | 0x00200000 onwards |
256KB | 0x40000 |
| 1 | script | UBI | u-boot.scr | 128KB | 0x00020000 | |||
| 2 | kernel | UBI | kernel.itb | 24MB | 0x00A00000 | |||
| 3 | dtb | UBI | kernel.dtb | 256KB | 0x00040000 | |||
| 4 | rootfs | UBIFS | rootfs.ubifs | 272MB | 0x11000000 | |||
cd $TOP_FOLDER
rm -rf nand-bin && mkdir nand-bin && cd nand-bin
ln -s $TOP_FOLDER/gsrd-socfpga/agilex5_devkit-gsrd-images/u-boot-agilex5_devkit-socdk-gsrd-atf/boot.scr.uimg boot.scr.uimg
ln -s $TOP_FOLDER/gsrd-socfpga/agilex5_devkit-gsrd-images/u-boot-agilex5_devkit-socdk-gsrd-atf/u-boot.itb u-boot.itb
ln -s $TOP_FOLDER/gsrd-socfpga/agilex5_devkit-gsrd-images/kernel.itb kernel-image
ln -s $TOP_FOLDER/gsrd-socfpga/agilex5_devkit-gsrd-rootfs/tmp/work/agilex5_devkit-poky-linux/linux-socfpga-lts/6.1.68-lts+git/linux-agilex5_devkit-standard-build/socfpga_agilex5_socdk_swvp.dtb kernel-dtb
ln -s $TOP_FOLDER/gsrd-socfpga/agilex5_devkit-gsrd-images/console-image-minimal-agilex5_devkit_nand.ubifs rootfs.ubifs
2. Create UBI configuration file for the root partition:
cd $TOP_FOLDER/nand-bin
cat <<EOT >ubinize_nand.cfg
[env]
mode=ubi
vol_id=0
vol_name=env
vol_size=256KiB
vol_type=dynamic

[script]
mode=ubi
image=boot.scr.uimg
vol_id=1
vol_name=script
vol_size=128KiB
vol_type=dynamic

[kernel]
mode=ubi
image=kernel-image
vol_id=2
vol_name=kernel
vol_size=24MiB
vol_type=dynamic

[dtb]
mode=ubi
image=kernel-dtb
vol_id=3
vol_name=dtb
vol_size=256KiB
vol_type=dynamic

[rootfs]
mode=ubi
image=rootfs.ubifs
vol_id=4
vol_name=rootfs
vol_type=dynamic
vol_size=400MiB
vol_flag=autoresize

EOT
3. Generate root.ubi file for root partition, using the ubinize_nand.cfg file generated in previous step. This file defines the components to be included in the root.ubi file as indicated in the table above. The command used to generate the file is ubinize which is available as part of the mtd-tools package. The parameters that ubinize command received are listed next:
- -p: physical erase block size of the flash
- -m: minimum input/output unit size of the flash
- -s: sub-pages and sub-page size, ubinize will take into account and put the VID header to same NAND page as the EC header
cd $TOP_FOLDER/nand-bin
ubinize -o root.ubi -p 1024KiB -m 8192 -s 8192 ubinize_nand.cfg
The following file is created:
- $TOP_FOLDER/nand-bin/root.ubi
export COMBINEDFILE=nand.img
dd if=/dev/zero bs=1024M count=1 | tr '\0' $'\xFF' > $COMBINEDFILE
# Adding u-boot.itb
dd conv=notrunc bs=1 if='u-boot.itb' of=$COMBINEDFILE seek=$((0x00000000))
# Adding root.ubi
dd conv=notrunc bs=1 if='root.ubi' of=$COMBINEDFILE seek=$((0x00200000))
The following file is created:
- $TOP_FOLDER/nand-bin/nand.img
Converting binaries created for silicon to be used for Simics
In 24.1 release there is a deviation between the binaries to be used in the virtual platforms and the ones used in real hardware. The pre-built binaries provided as reference are binaries targeted for silicon, so if we want to use them in Simics, you will require to patch them so these could be used in Sillicon. The following steps provide a guide about how to perform this patching mechanism. The procedure consists of replacing the Vanilla Linux device tree included as part of the kernel.itb with the one that applies to the virtual platform. The kernel.itb file is created using a .its file which indicates the images that integrate this file. We also, provide instructions about how the pre-built SD Card image is modified to include the new kernel.itb in the fatfs partition.cd $TOP_FOLDER mkdir bianriesPatchDir && cd bianriesPatchDir wget <binaries_location>/fit_kernel_agilex5_devkit.its wget <binaries_location>/Image.lzma wget <binaries_location>/socfpga_agilex5_socdk_nand.dtb wget <binaries_location>/socfpga_agilex5_socdk_emmc.dtb wget <binaries_location>/socfpga_agilex5_socdk.dtb wget <binaries_location>/socfpga_agilex5_socdk_aic0.dtb wget <binaries_location>/socfpga_agilex5_socdk_debug2.dtb wget <binaries_location>/nand.core.rbf wget <binaries_location>/emmc.core.rbf wget <binaries_location>/ghrd.core.rbf wget <binaries_location>/aic0.core.rbf wget <binaries_location>/debug2.core.rbf wget https://www.rocketboards.org/foswiki/pub/Documentation/Agilex5SoCSimicsVirtualPlatformsReferenceGuide/socfpga_agilex5_socdk_swvp.dtb # Replace device tree sed -i "s/socfpga_socdk_vanilla/socfpga_socdk/g" fit_kernel_agilex5_devkit.its sed -i "s/socfpga_agilex5_vanilla\.dtb/socfpga_agilex5_socdk_swvp\.dtb/g" fit_kernel_agilex5_devkit.its # Regenerate the kernel.itb file mkimage -f fit_kernel_agilex5_devkit.its kernel.itb # Update now the SDCard wget <binaries_location>/gsrd-console-image-agilex5_devkit.wic # Explore the partitions in the SD card image $TOP_FOLDER/gsrd-socfpga/poky/scripts/wic ls gsrd-console-image-agilex5_devkit.wic $TOP_FOLDER/gsrd-socfpga/poky/scripts/wic ls gsrd-console-image-agilex5_devkit.wic:1 # Replace the kernel.itb $TOP_FOLDER/gsrd-socfpga/poky/scripts/wic rm gsrd-console-image-agilex5_devkit.wic:1/kernel.itb $TOP_FOLDER/gsrd-socfpga/poky/scripts/wic cp kernel.itb gsrd-console-image-agilex5_devkit.wic:1/Note: Once that converting kernel.itb, the QSPI image can be created in the same way as it is specified in Build QSPI Boot Image section. Also to create the NAND image, as indicated in Build NAND Boot Image section, is it necessary to use the socfpga_agilex5_socdk_swvp.dtb which can be obtained similarly to how this was obtained here.
Known Issues with the Release
For known issues in this release please refer to the Intel Simics Simulator for FPGA Release page.Intel Agilex® 5 E-Series Simics Virtual Platform - Universal
This virtual platform is associated with the agilex5e-universal.simics target script. The following figure shows a high-level block diagram of this virtual platform. In this diagram, you can observe the main components that can be exercised during the execution of the use cases described later on this page. The implementation of this virtual platform allows all the peripherals in the HPS to be enabled at the same time, which is not possible in physical hardware implementations. The pinmux and Combo PHY impose restrictions on the physical hardware. In the case of the pinmux in the physical hardware, you can enable only a subset of peripherals simultaneously because there are not enough pins if all pins are enabled simultaneously. This limitation does not exist in the Intel Agilex 5 E-Series Universal Virtual Platform. For the Combo PHY, the physical hardware allows only one flash controller (NAND or SDMMC) to be enabled at a time. However, the virtual platform allows both to be enabled simultaneously.
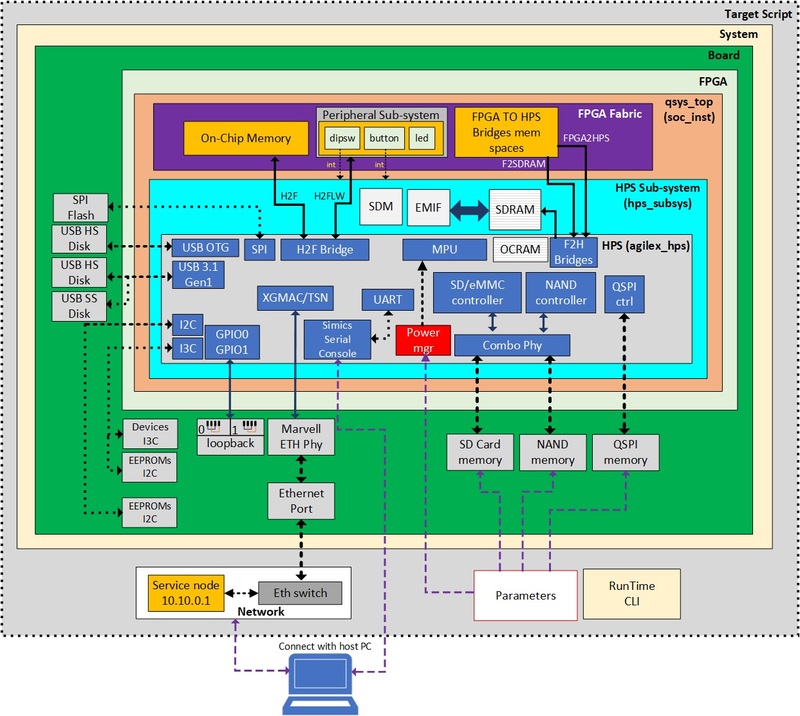 In this block diagram:
 - The architecture of the virtual platform follows a hierarchy that goes from target script → system → board → fpga → qsys_top → hps_subsystem → agilex_hps, which is aligned with the Simics virtual platform development philosophy that tries to match with the real golden hardware reference design (GHRD) architecture.
- The target script instantiates the system component, provides the CLI run time commands, and creates the network configuration. This script also defines the parameters that configure other components.
- The system component represents the complete virtual platform system and instantiates the board component. This component is implemented in a Python file.
- The board component represents the model of a PCB (analogous to a development kit). It includes the instance of the FPGA component and all board components connected to the FPGA (for example, flash devices, ethernet PHY). The GPIO loopback connection is implemented here. This component is implemented in a Python file.
- The FPGA component represents the top-level hardware design model in the Intel Quartus Prime software project design that targets the Intel Agilex 5 E-Series SoC FPGA device. It matches the logical hierarchy of the fictitious GHRD that the Intel Agilex 5 E-Series Universal Virtual Platform models. This component only instantiates the qsys_top component and is implemented as a Python script.
- The qsys_top component matches the design's top view being modeled and corresponds to the system seen from the Platform Designer under the GHRD (soc_inst instance). The HPS subsystem component and the components included as part of the FPGA fabric design are instantiated under the qsys_top component. The qsys_top component is modeled as a Python script.
- The FPGA fabric design corresponds to the logic model implemented in the FPGA fabric.
- The HPS subsystem component corresponds to the model of the module that integrates all components associated with the HPS in the Intel Agilex 5 E-Series device. It includes the HPS models, SDM mailbox, and EMIF model.
- The Intel Agilex 5 HPS component in the virtual platform is an Intel Simics model that corresponds to the Hard Processor System Intel Agilex 5 FPGA IP in the Intel Quartus Prime software.
- The embedded software running in the HPS component is expected to be the same that can be run in the real silicon. Exercising the HPS-embedded software in this virtual platform allows you to debug the software using the Simics debug capabilities.
Main Features Supported by the Intel Agilex 5 E-Series Universal Virtual Platform
Boot an Operative System
The Intel Agilex 5 E-Series Virtual Platform allows exercising the HPS software in all parts of the boot flow for Linux* and Zephyr* operating systems. You can exercise the boot flow from a flash device such as an SD Card, NAND flash, or QSPI flash. Booting from an SD Card is the default boot mode.Basic Ethernet
The basic ethernet functionality is configured from the agilex5e-universal.simics target script.
The virtual platform simulates a network switch and a router in the simulated environment using the service node component referred to as service_node_cmp0. This provides a TFTP server to transfer files from the host PC to the target system and a DHCP server to assign an IP to the target system dynamically.
The target device provides ethernet functionality using the XGMAC/TSN devices, enabling an
ethX ethernet link. This link connects with an ethernet switch instantiated in the target script. Only the TSN0 instance is connected to this switch using the Marvell ethernet Phy instantiated at the board level. Basic ethernet support in the virtual platform allows the target software to set a MAC address locally to allow communication over the network. This supports all key transport layers of a protocol, such as TCP, UDP, and ICMP. Basic ethernet allows communication over IPv4 and IP6 protocols while supporting different hardware offloading features. The virtual platform supports L2, L3, and L4 filtering and can show network statistics.
CPU Power-On and Boot Core Selection
The virtual platform supports setting the CPU power-on settings and the CPU boot core selection. This configuration is defined at the target script level (agilex5e-universal.simics) for this virtual platform. Based on the configuration, the virtual platform exposes only the appropriate number of cores available to the target software. When multiple CPUs are enabled, the virtual platform is configured to support symmetric multiprocessing (SMP).
Reset Flow
The virtual platform is designed to support all key reset flows described in the Intel Agilex 5 E-Series Technical Reference Manual. Reset flows initiated by the CPU are simulated through the same mechanism in which the CPU writes to the appropriate addresses (reset manager device). Resets triggered by the external hardware signaling are simulated with Simics' commands.
| Reset Type | Recipe | Notes |
|---|---|---|
| Power-on reset | Not supported | The power-on reset is not supported as its effect is equivalent to restarting the simulation in a virtual platform simulation. However, if this is required for some exceptional use cases, you can trigger the cold reset instead, as this resets most domains. |
| HPS cold reset | system.board.hps-cold-reset |
Simulates toggling the HPS_COLD_nRESET pin using the command registered in the board component. |
| HPS warm reset | system.board.fpga.soc_inst.hps_subsys.agilex_hps.hps-warm-reset |
Simulates a warm reset of the HPS without triggering any other event. This type of reset is not enabled through external means in hardware. The command is registered in the HPS component. |
| Watchdog reset | Software-based | The watchdog timer peripheral in the HPS can be configured and enabled through software. When the watchdog expires, the HPS resets (only the trigger of warm reset is supported). |
GPIO Loopback Connection
The virtual platform supports the feature that allows creating a loopback connection in certain pins in GPIO0 and GPIO1 ports. This is implemented at the board component level. The loopback implementation directly connects GPIO in and out pins of the GPIO ports in both directions to reflect the same state on those pins. In each GPIO port, the pair of pins that are connected are shown in the following table:
| Pin Source | Pin Destination |
|---|---|
| 0 | 1 |
| 5 | 6 |
| 18 | 19 |
| 20 | 21 |
system.board.create-gpio-loopback.
Note: The loopback connection is activated by default from the target script.
USB Disks Hot-Plug Support
The virtual platform instantiates three USB disks that support hot-plugging by using Simics CLI commands to emulate plugging and unplugging the USB disks. The current connection of the USB disks in this virtual platform is indicated in the following table:| Disk | Type | Slot | USB Controller |
|---|---|---|---|
| usb3_disk | SuperSpeed (SS) | usb3 | USB 3.1 Gen 1 |
| usb3_hs_disk | High Speed (HS) | usb2 | USB 3.1 Gen 1 |
| usbotg_disk | High Speed (HS) | otg | USB 2.0 OTG |
FPGA Fabric Example Design
The FPGA Fabric example design includes one instance of a On-Chip memory design exist in the FGPA fabric model. This is located directly under the qsys_top component. This On-Chip memory instance has a size of 1 MB and is connected to the HPS2FPGA bridge. This On-Chip memory model supports reading and writing to any memory location. You can access the memory designs using direct memory access to the memory locations in which these are mapped under the HPS2FPGA bridge memory space or by accessing the memories example design as a memory space or by accessing the memories example design as a memory space. The mapping of the memory instance is defined as follows:| Example Design Name | Bridge | Size | Start address | End Address |
|---|---|---|---|---|
| example_design | hps2fpga | 1 MB | 0x0040000000 | 0x00400FFFFF |
base_addr. The description of this parameter is described as follows:
| Parameter | Description | Range | Default Value |
|---|---|---|---|
| base_addr | An offset value that indicates the mapping of the instance taking as reference the Start Address value defined in the previous table. | Integer | 0x00000000 |
| Component | Mapping Address | Range | Register Information |
|---|---|---|---|
| button_pio | 0x00010060 | 0x10 | [0x0] - DATA[0:0]: Read state of the button. Read Only. [0x8] - INTERRUPTMASK[0:0]- Enable('1’)/Disable('0’) the interrupt trigger. When dsiable, the interrupt is cleared. Read/Write |
| dipsw_pio | 0x00010070 | 0x10 | [0x0] - DATA[0:0]: Read state of the button. Read Only. [0x8] - INTERRUPTMASK[0:0]- Enable('1’)/Disable('0’) the interrupt trigger. When dsiable, the interrupt is cleared. Read/Write |
| led_pio | 0x00010080 | 0x10 | [0x0] - DATA[31:0]: Set and read the state of the LEDs. Read/Write |
| Component | Interrupt | HPS Interrupt Connection |
|---|---|---|
| button_pio | periph_button_irq | f2s_fpga_irq[0] – SIP 49 |
| dipsw_pio | periph_dipsw_irq | f2s_fpga_irq[1] – SIP 50 |
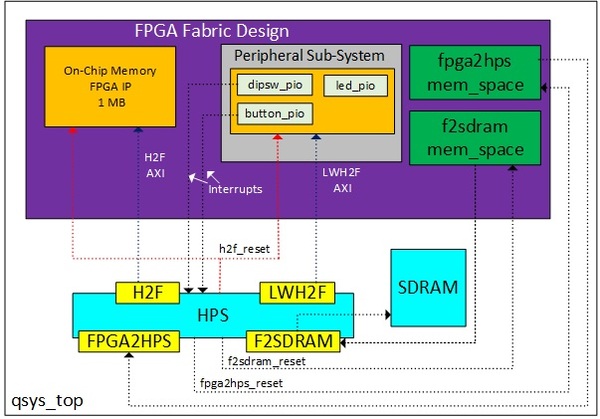
FPGA-to-HPS Bridges
The FPGA-To-HPS bridges provide a way in which the FPGA fabric IPs can interact with the HPS subsystem and the SDRAM. The bridge implementation includes two new memory spaces in the FPGA logic model that are used to send read and write transactions to the HPS or SDRAM component from the FPGA logic passing through the FPGA-to-HPS bridges.- FPGA to HPS bridge (FPGA2HPS): Connects the FPGA2HPS memory space with the HPS component.
- FPGA to SDRAM bridge (FPGA2SDRAM): Connects the F2SDRAM memory space with the HPS component.
Configurable Parameters in the Intel Agilex® 5 E-Series Universal Virtual Platform
The parameters that you can configure are shown in the following table:| Parameter | Description | Range | Default Value |
|---|---|---|---|
sd_image_filename |
Name of the SD image to load into the SD memory model of the board component. Supported formats are .img and .wic. |
Filename string | "" |
fsbl_image_filename |
First-stage boot loader file. The supported format is .bin. |
Filename string | "" |
hps_boot_core |
The CPU to use as the boot core. | Integer [0,2] | 0 |
hps_core0_1_power_on |
The power-on states of CPU 0/1. | Boolean | True |
hps_core2_power_on |
The power-on states of CPU 2. | Boolean | True |
hps_core3_power_on |
The power-on states of CPU 3. | Boolean | True |
create_hps_serial0_console |
Choose whether to create or not a console component and connect it to the serial0 peripheral of the HPS IP. |
Boolean | True |
create_hps_eth0_network |
Choose whether to create or not a basic ethernet network and connect the ethX peripheral of the HPS IP to this. |
Boolean | True |
create_hps_sd_card |
Create the SD card in the board component and connect it to the SD/eMMC controller. You can set either the create_hps_sd_card or create_hps_mmc parameter to true at a time. | Boolean | True |
create_hps_mmc |
Create the eMMC card in the board component and connect it to the SD/eMMC controller. You can set either the create_hps_sd_card or create_hps_mmc parameter to true at a time. | Boolean | False |
nand_data_image_filename |
Name of the NAND image to load into the NAND memory model of the board component. The supported format is raw binary (.bin or .craff). | Filename string | "" |
nand_spare_image_filename |
Name of the NAND spare image to load into the NAND memory model of the board component. The supported format is raw binary (.bin or .craff). | Filename string | "" |
qspi_image_filename |
Name of the QSPI image to load into the QSPI memory model of the board component. The supported format is raw binary (.bin or .craff). | Filename string | "" |
usb3_image_filename |
Name of the USB disk image corresponding to the SuperSpeed disk in the board component connected to the USB 3.1 controller. | Filename string | "" |
usb3_hs_image_filename |
Name of the USB disk image corresponding to the high-speed disk in the board component connected to the USB 3.1 controller. | Filename string | "" |
usb_otg_image_filename |
Name of the USB disk image corresponding to the high-speed disk in the board component connected to the USB 2.0 OTG controller. | Filename string | "" |
hps_cpu_freq_mhz |
ARM cores frequency in Megahertz (MHz). | Integer [400 - 1500] |
400 |
Use Cases Supported by the Intel Agilex® 5 E-Series Universal Virtual Platform
The following sections explain some supported use cases using the Intel Agilex® 5 E-Series Universal virtual platform. The preconditions required to execute them are listed in the following section:Simulation Setup
Consider that the Intel Simics Simulator for Intel FPGAs Simulator has been installed on a Linux System and the output binaries generated from Build_Instructions section are already available. 1. Create a project directory under the Intel Simics Simulator installation directory (Assuming it is SimicsInstallDir):$ mkdir project-1 $ cd project-12. Under the new project directory created, deploy the agilex5e-universal virtual platform:
$  <Simics installation dir>/simics/bin/simics_intelfpga_cli –-deploy agilex5e-universal
Simics(R) Simulator for Intel(R) FPGA CLI:
INFO: Preparing to initialize /home/simicsUser/SimicsInstallDir/project-1 as a
Simics workspace
Project created successfully
# Observe that the directory has been initialized and the simics and simics-gui
# commands appear in the project directory. Also, the target directory is
# created. This includes the target script corresponding to the deployed
# platform.
3. Build the virtual platform components:
$ make
=== Environment Check ===
'/home/simicsUser/SimicsInstallDir/project-1' is up-to-date
gcc version 9
=== Building module agilex5e-universal-board-comp ===
:
=== Building module agilex5e-universal-fpga-comp ===
:
=== Building module agilex5e-universal-system-comp ===
:
Copying agilex5_icon_84x84.png
4. Copy the following binaries created in the following files created in Build_Instructions section to the project directory:
- gsrd-socfpga/agilex5_devkit-gsrd-images/gsrd-console-image-agilex5_devkit.wic
- gsrd-socfpga/agilex5_devkit-gsrd-images/u-boot-agilex5_devkit-socdk-gsrd-atf/u-boot-spl-dtb.bin
- qspi-bin/flash_image_jic.rpd
- nand-bin/nand.img
fsbl_image_filename parameter with the first-stage bootloader. If the boot implies booting from an SD Card device, configure sd_image_filename and create_hps_sd_card parameters (this image should include the main bootloader and the OS and/or application images). As part of the configuration, select the core used to boot using the hps_boot_core parameter, which could be core 0 (A55) or core 2 (A76). You can configure the virtual platform either by updating the
agilex5e-universal.simics target script or creating a separate top-level target script (named based on the simulation purpose) that is expected to be run with this (example: uboot-linux_sdcard.simics used to boot from U-Boot to Linux from an SD Card device). You become the owner of this new target script, in which, you can set the required parameters and call the original virtual platform target script (targets/agilex5e-universal/agilex5e-universal.simics path). An example of the setup required to run a simulation that exercises the boot flow going from U-Boot to Linux, booting from an SD Card is shown in the following:
#uboot-linux_sdcard.simics
$sd_image_filename = "gsrd-console-image-agilex5_devkit.wic"
$fsbl_image_filename = "u-boot-spl-dtb.bin"
$hps_boot_core = 0
$create_hps_sd_card = TRUE
run-command-file "targets/agilex5e-universal/agilex5e-universal.simics"
Note: The uboot-linux_sdcard.simics file must be created under the Intel Simics project directory. Tip: Any specific configuration needed for a use case is indicated under the Setup section of that use case.
Use Case: Exercise SDCard Boot Flow from FSBL to Linux
This use case consists of booting from an SDCard device going from U-Boot to Linux prompt passing through U-Boot SPL → ATF → U-Boot → Linux.Setup
Complete the procedure described in the Simulation Setup section.Procedure
To exercise this use case, follow the below steps once the Simulation setup is complete: 1. From the project directory, launch the simulation using theuboot-linux_sdcard.simics target script. This script launches the simulator and the current terminal becomes the Simics CLI:
$ ./simics uboot-linux_sdcard.simics2. From the Simics CLI, start running the simulation with the
run command.
simics> run
3. Wait to get to the Linux prompt in the target serial console.
4. Login into the Linux prompt using the root user without a password.
# Target Serial console U-Boot SPL 2023.10 (Mar 21 2024 - 07:41:59 +0000) Reset state: Cold MPU 875000 kHz L4 Main 400000 kHz L4 sys free 100000 kHz L4 MP 200000 kHz L4 SP 100000 kHz SDMMC 50000 kHz init_mem_cal: Initial DDR calibration IO96B_0 succeed io96b_mb_init: num_instance 1 io96b_mb_init: get memory interface IO96B 0 : DDR: size check success DDR: firewall init success DDR: init success QSPI: Reference clock at 400000 kHz Trying to boot from MMC1 ## Checking hash(es) for config board-0 … OK ## Checking hash(es) for Image atf … crc32+ OK ## Checking hash(es) for Image uboot … crc32+ OK ## Checking hash(es) for Image fdt-0 … crc32+ OK WARNING: Data cache not enabled NOTICE: BL31: Boot Core = 0 NOTICE: BL31: CPU ID = 81000000 NOTICE: BL31: v2.10.0 (release):QPDS24.1_REL_GSRD_PR NOTICE: BL31: Built : 08:52:03, Mar 21 2024 U-Boot 2023.10 (Mar 21 2024 - 07:41:59 +0000)socfpga_agilex5 CPU: Intel FPGA SoCFPGA Platform (ARMv8 64bit Cortex-A55/A76) Model: SoCFPGA Agilex5 SoCDK DRAM: 2 GiB (effective 8 GiB) Core: 45 devices, 26 uclasses, devicetree: separate WDT: Not starting watchdog@10d00200 WDT: Not starting watchdog@10d00300 WDT: Not starting watchdog@10d00400 WDT: Not starting watchdog@10d00500 WDT: Not starting watchdog@10d00600 NAND: 4096 MiB : Loading Device Tree to 00000000ff8d8000, end 00000000ff8e4195 … OK Working FDT set to ff8d8000 SF: Detected mt25qu02g with page size 256 Bytes, erase size 64 KiB, total 256 MiB Enabling QSPI at Linux DTB... Working FDT set to ff8d8000 QSPI clock frequency updated RSU: Firmware or flash content not supporting RSU RSU: Firmware or flash content not supporting RSU RSU: Firmware or flash content not supporting RSU RSU: Firmware or flash content not supporting RSU Starting kernel … Deasserting all peripheral resets [ 0.000000] Booting Linux on physical CPU 0x0000000000 [0x412fd050] [ 0.000000] Linux version 6.1.68-altera (oe-user@oe-host) (aarch64-poky-linux-gcc (GCC) 13.2.0, GNU ld (GNU Binutils) 2.41.0.20231213) #1 SMP PREEMPT Thu Mar 28 07:56:27 UTC 2024 [ 0.000000] Machine model: SoCFPGA Agilex5 SoCDK : [ 1.020231] xhci-hcd xhci-hcd.0.auto: irq 73, io mem 0x11000000 [ 1.021020] xhci-hcd xhci-hcd.0.auto: xHCI Host Controller [ 1.021620] xhci-hcd xhci-hcd.0.auto: new USB bus registered, assigned bus number 3 [ 1.022435] xhci-hcd xhci-hcd.0.auto: Host supports USB 3.1 Enhanced SuperSpeed [ 1.023884] hub 2-0:1.0: USB hub found [ 1.024310] hub 2-0:1.0: 1 port detected [ 1.025154] usb usb3: We don't know the algorithms for LPM for this host, disabling LPM. [ 1.026679] hub 3-0:1.0: USB hub found [ 1.027125] hub 3-0:1.0: 1 port detected [ 1.039603] EXT4-fs (mmcblk0p2): mounted filesystem with ordered data mode. Quota mode: none. [ 1.040521] VFS: Mounted root (ext4 filesystem) on device 179:2. [ 1.041280] devtmpfs: mounted [ 1.045797] Freeing unused kernel memory: 7744K [ 1.069112] Run /sbin/init as init process [ 1.121375] systemd[1]: System time before build time, advancing clock. [ 1.145544] systemd[1]: systemd 254.4^ running in system mode (-PAM -AUDIT -SELINUX -APPARMOR +IMA -SMACK +SECCOMP -GCRYPT -GNUTLS -OPENSSL +ACL +BLKID -CURL -ELFUTILS -FIDO2 -IDN2 -IDN -IPTC +KMOD -LIBCRYPTSETUP +LIBFDISK -PCRE2 -PWQUALITY -P11KIT -QRENCODE -TPM2 -BZIP2 -LZ4 -XZ -ZLIB +ZSTD -BPF_FRAMEWORK +XKBCOMMON +UTMP +SYSVINIT default-hierarchy=hybrid) [ 1.148824] systemd[1]: Detected architecture arm64. Welcome to Poky (Yocto Project Reference Distro) 4.3.4 (nanbield)! [ 1.205537] systemd[1]: Hostname set toThis finishes the main scenario of this use case, but there are some extensions that are described next. Note: You can speed-up the boot process by skipping the U-Boot autoboot countdown by pressing any key and then typing the. [ 1.207086] systemd[1]: Initializing machine ID from random generator. [ 1.933613] systemd[1]: Queued start job for default target Multi-User System. : Starting Virtual Console Setup... [ 6.695016] socfpga-dwmac 10830000.ethernet eth1: IEEE 1588-2008 Advanced Timestamp supported [ 6.696067] socfpga-dwmac 10830000.ethernet eth1: registered PTP clock [ 6.705245] socfpga-dwmac 10830000.ethernet eth1: FPE workqueue start [ 6.705927] socfpga-dwmac 10830000.ethernet eth1: configuring for phy/rgmii link mode [ 6.707558] 8021q: adding VLAN 0 to HW filter on device eth1 [ 6.708842] socfpga-dwmac 10830000.ethernet eth1: Link is Up - 1Gbps/Full - flow control rx/tx [ 6.709802] IPv6: ADDRCONF(NETDEV_CHANGE): eth1: link becomes ready [ OK ] Finished Virtual Console Setup. [ OK ] Started Network Configuration. [ OK ] Reached target Network. [ OK ] Started Hostname Service. Poky (Yocto Project Reference Distro) 4.3.4 dhcp0 ttyS0 dhcp0 login: root root@dhcp0:~#
boot command:
U-Boot 2023.01 (Jun 20 2023 - 00:59:09 +0000)socfpga_agilex5

CPU:   Intel FPGA SoCFPGA Platform (ARMv8 64bit Cortex-A55/A76)
Model: SoCFPGA Agilex5 SoCDK

:
Net:   No ethernet found.
Hit any key to stop autoboot:  0
SOCFPGA_AGILEX5 # boot
switch to partitions #0, OK
mmc0 is current device
Scanning mmc 0:1...
Use Case: Exercise Hello Application
This is an extension of the Use Case: Exercise SDCard Boot Flow from FSBL to Linux and includes executing the hello application from the Linux prompt.Setup
Complete the procedure described in the Simulation Setup section.Procedure
1. Execute the parent use case to get to the Linux prompt and log in. 2. Execute the hello application located in theintelFPGA directory. After executing this application, the Hello SoC FPGA! is displayed on the command prompt:
# Target Serial console
root@dhcp0:~#  ./intelFPGA/hello
Hello SoC FPGA!
Use Case: Exercise System Check Application with HPS LED Turn On/Off control
This use case is an extension of the Use Case: Exercise SDCard Boot Flow from FSBL to Linux and includes executing the System Check Application to observe the state of the HPS LEDs. The execution of this use case works under the assumption that the LEDs are connected to the corresponding GPIOs in the virtual platform.Setup
Same setup as the parent use case.Procedure
1. Execute the parent use case to get to the Linux prompt and log in. 2. From the target system serial console, execute the System Check application (syschk) located under the intelFPGA directory. This shows some system information, such as the target system IP address and the state of the HPS LEDs. Observe that the initial state of the three HPS LEDs is OFF.
# Target Serial console
root@dhcp0:~#  ./intelFPGA/syschk
# Target Serial console
Actual changes:
                              ALTERA SYSTEM CHECK
lo                    : 127.0.0.1       usb3                  : xHCI Host Contro
eth1                  : 10.10.0.100     usb1                  : DWC OTG Controll
                                        usb2                  : xHCI Host Contro
hps_led2              : OFF
hps_led0              : OFF             serial@10c02100       : disabled
mmc0::                : OFF             serial@10c02000       : okay
hps_led1              : OFF
3. Change the state of any of the HPS LEDs using the /sys/class/led/hps_ledX/brightness files writing either a '1' or '0' to these. For this, you need to first close the System Check application by typing Ctrl+C in the target serial console. Change the state of the LEDs to 'ON' state as indicated next and reopen the System Check application to observe the new state of the LEDs.
# Target Serial console
root@dhcp0:~# echo 1 > /sys/class/leds/hps_led0/brightness
root@dhcp0:~# echo 1 > /sys/class/leds/hps_led1/brightness
root@dhcp0:~# echo 1 > /sys/class/leds/hps_led2/brightness
root@dhcp0:~# ./intelFPGA/syschk
# Target Serial console
Actual changes:
                                    ALTERA SYSTEM CHECK

lo                    : 127.0.0.1       usb3                  : xHCI Host Contro
eth1                  : 10.10.0.100     usb1                  : DWC OTG Controll
                                        usb2                  : xHCI Host Contro
hps_led2              : ON
hps_led0              : ON              serial@10c02100       : disabled
mmc0::                : OFF             serial@10c02000       : okay
hps_led1              : ON
4. Close the System Check application with Ctrl+C and return the HPS LEDs to the OFF state. Reconfirm that the state of the LEDs was updated to the new state in the System Check application.
# Target Serial console
root@dhcp0:~# echo 0 > /sys/class/leds/hps_led0/brightness
root@dhcp0:~# echo 0 > /sys/class/leds/hps_led1/brightness
root@dhcp0:~# echo 0 > /sys/class/leds/hps_led2/brightness
root@dhcp0:~# ./intelFPGA/syschk
# Target Serial console
Actual changes:
                              ALTERA SYSTEM CHECK

lo                    : 127.0.0.1       usb3                  : xHCI Host Contro
eth1                  : 10.10.0.100     usb1                  : DWC OTG Controll
                                        usb2                  : xHCI Host Contro
hps_led2              : OFF
hps_led0              : OFF             serial@10c02100       : disabled
mmc0::                : OFF             serial@10c02000       : okay
hps_led1              : OFF
5. Close the System Check application with Ctrl+C.
Use Case: Access the Web Server Application from Host PC
This use case is an extension of the Use Case: Exercise SDCard Boot Flow from FSBL to Linux and includes accessing from the host PC a web page that is being hosted by the target system, which runs a web server application. This application is launched automatically as part of the Linux boot process.Setup
Using theuboot-linux_sdcard.simics Simics script, create an incoming port forwarding shown in the following:
connect-real-network-port-in ethernet-link = ethernet_switch0 target-ip=10.10.0.100 target-port = 80 host-port = 4080 -tcpThe port forwarding created allows you to access the webpage from the host PC. In the configuration, use the
connect-real-network-port-in command, port 4080 in the host PC, and the target port in the target system is 80 (HTTP port). You also assign as the target IP, the IP that corresponds to the target system, which is 10.10.0.100. Also, indicate that this port forwarding is related to the TCP protocol. YOu can check the new port forwarding setup using the list-port-forwarding-setup command (this setup also could be done from the Simics CLI but in this case, the simulation should be stopped to perform the network configuration).
Procedure
1. Execute the parent use case to get to the Linux prompt and log in. 2. From the host PC, open a web browser and access the webpage running in the target system using the address: http://localhost:4080 . Note that the host machine is referred to as localhost and the port is 4080, which is the one visible from the host PC.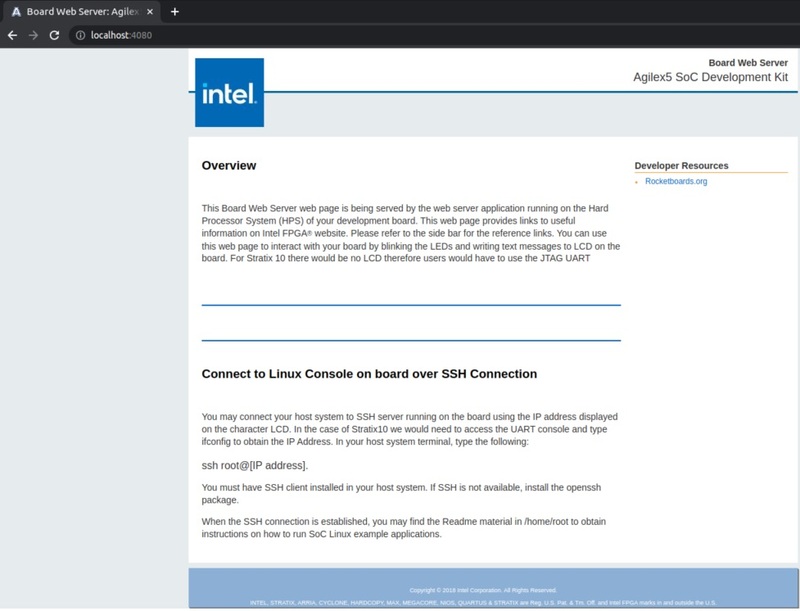 Note: The IP address of the host PC could be used as well instead of localhost.
Note: The webpage displays instructions to connect to the target system using SSH. These instructions are valid if you run these binaries in real hardware. If you want to establish the SSH connection with a simulated target system, create a second incoming port forwarding with the following setup:
connect-real-network-port-in ethernet-link = ethernet_switch0 target-ip=10.10.0.100 target-port = 22 host-port = 4022 -tcp
ssh -p 4022 root@localhost from the host PC or ssh -p 4022 root@<host PC IP address> from any other PC in the same network.
A variation of this use case consists of accessing the web page from another PC under the same network that the host PC (both PCs in a real network). For this, use the IP address of the host PC instead of localhost and continue using the same port: http://<host PC address>:4080.
Note: In the Linux Ubuntu system, you can get the IP address using the ifconfig command from a terminal. Also, ensure that the firewall in this PC is not blocking port 80.
Use Case: Access ON-Chip RAM in FPGA Example Design from Linux Prompt
This use case is an extension of the Use Case: Exercise SDCard Boot Flow from FSBL to Linux and includes accessing from Linux the FPGA fabric example design for read and write operations. For this, the devmem2 Linux application is used. Also, a Simics CLI script is used to write some initial content to the memories in the example design.Setup
Start with the setup as the parent use case. From the Simics CLI or using theuboot-linux_sdcard.simics Simics script, add the script branch that adds some content to the memories in the example design. The script branch writes 256 32-bit words in each memory.
# uboot-linux_sdcard.simics
:
script-branch{
  # Wait until we see any message in the Serial Console to be sure the model has been fully initialized
  bp.console_string.wait-for system.board.fpga.soc_inst.hps_subsys.agilex_hps.console0.con "U-Boot SPL"
  $idx = 0
  while ($idx < 256) {
    $addr = 4*$idx
    $valueMem1 = 0xcafe0000 | $idx
    echo "Set Values " + (hex($valueMem1)) + " at address " + (hex($addr))
    system.board.fpga.soc_inst.example_design.design_mem.write $addr $valueMem1

    $idx+=1
  }
}
Procedure
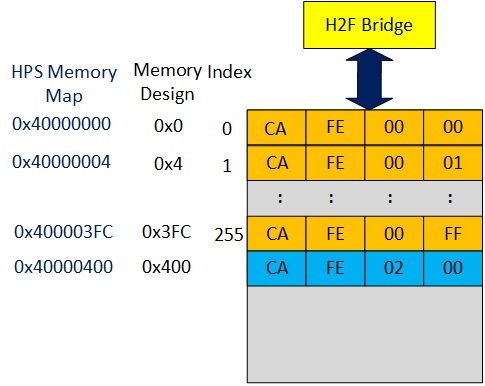
1. Execute the parent use case to get to the Linux prompt and log in.2. Read the first and last locations written by the CLI script in the memories in the example design using the devmem2 application in Linux. This command receives the physical memory that wants to be accessed (in this case, based on the offset where the HPS2FPGA bridges are mapped to):
dhcp0 login:  root
root@dhcp0:~#  devmem2 0x40000000 w
/dev/mem opened.
Memory mapped at address 0xffffa3940000.
Read at address  0x40000000 (0xffffa3940000): 0xCAFE0000
root@dhcp0:~#  devmem2 0x400003fc w
/dev/mem opened.
Memory mapped at address 0xffff91ac1000.
Read at address  0x400003FC (0xffff91ac13fc): 0xCAFE00FF
Observe that the values read matches the expected one shown in the figure above. Note: The addresses in parenthesis in the capture above correspond to the virtual address in which Linux maps the physical address corresponding to the location in the memory example design that is being accessed. This virtual address may be different than the one shown in the capture. 3. Use the
devmem2 command to write into the memories in the example design and read back the data. For this, the following addresses are selected:
| Bridge | Address | Memory Design Addr | Index | Value |
|---|---|---|---|---|
| HPS2FPGA | 0x40000400 | 0x400 | 256 | 0xcafe0200 |
root@dhcp0:~#  devmem2 0x40000400 w 0xcafe0200
/dev/mem opened.
Memory mapped at address 0xffffbd034000.
Read at address  0x40000400 (0xffffbd034400): 0x00000000
Write at address 0x40000400 (0xffffbd034400): 0xCAFE0200, readback 0xCAFE0200
4. Read back to the previous memory location written to confirm the operation was performed successfully.
root@dhcp0:~#  devmem2 0x40000400 w
/dev/mem opened.
Memory mapped at address 0xffffa5ab9000.
Read at address  0x40000400 (0xffffa5ab9400): 0xCAFE0200
Use Case: Excercise Peripheral Components in FPGA Fabric Example Design
This use case is an extension of the Use Case: Exercise SDCard Boot Flow from FSBL to Linux and exercising:- LED I/O component to write/and read the state of the LED from Simics CLI and from U-Boot shell
- Dip-Swich and Push-Button I/O components to change the state of the input from Simics CLI and read the state of the input from U-Boot shell. Also configure the triggering of an nterrupts from these component to the HPS.
Setup
Complete the procedure described in the Simulation Setup section.Procedure
1. Start the simulation similar to how it is done in the main use case, but in the serial console stop the U-Boot autoboot by pressing a key on the reception of the message "Hit any key to stop autoboot:".2. Here you are going to exercise the setting of some LEDs. Read the state of the LEDs I/O pins from the U-Boot shell through memory access using the address in which the DATA register of this component is mapped (0x20010080) and turn-on the 3 LEDs associated with the 3 less significative bits in this register. Then read-back the state of these pins to confirm these has been updated. You can confirm that the state of the LED's was updated reading directly into the DATA register of the LED I/O components from the Simics CLI.
# U-Boot shell
SOCFPGA_AGILEX5 # md 0x20010080 1
20010080: 00000000                             ….
SOCFPGA_AGILEX5 # mw 0x20010080 0x7 1
SOCFPGA_AGILEX5 # md 0x20010080 1
20010080: 00000007
# Simics CLI
running> print-device-reg-info system.board.fpga.soc_inst.periph_subsys.led_pio.bank.regs.DATA
 [system.board.fpga.soc_inst.periph_subsys.led_pio.bank.regs.DATA]

             Bits : 32
           Offset : 0x0
            Value : 7

Bit Fields:
    Data @ [31:0] : 00000000000000000000000000000111
3. Next you will exercise the toggling the input pin of the dip-switch component using the Simics CLI through the signal_raise() and signal_lower() and then reading back the state of the pin using the DATA register in this component using the U-Boot shell through the corresponding memory location of this register (0x20010070).
# Simics CLI
running> @conf.system.board.fpga.soc_inst.periph_subsys.dipsw_pio.port.input_io[0].iface.signal.signal_raise()
None
# U-Boot shell
SOCFPGA_AGILEX5 # md 0x20010070 1
20010070: 00000001
# Simics CLI
running>  @conf.system.board.fpga.soc_inst.periph_subsys.dipsw_pio.port.input_io[0].iface.signal.signal_lower()
None
# U-Boot shell
SOCFPGA_AGILEX5 # md 0x20010070 1
20010070: 00000000                             ….
4. Finally you are going to exercise triggering an interrupt and clearing the interrupt generated from the rising edge of the input in the button I/O component. This will be exercised from the Simics CLI. To observe that the interrupt is triggered, the log level of the interrupt controller is increased. First the interrupt needs to be enabled using the INTERRUPT register in this component. Once the interrupt is enabled, we can assert the input signal and observe that the interrupt is triggered and the DATA register gets also updated with the set value ('1'). Finally, you will clear the interrupt using again the INTERRUPT register.
# Simics CLI
running> log-level object = system.board.fpga.soc_inst.hps_subsys.agilex_hps.gic level = 4
[system.board.fpga.soc_inst.hps_subsys.agilex_hps.gic] Changing log level: 1 → 4
running>  read-device-reg system.board.fpga.soc_inst.periph_subsys.button_pio.bank.regs.DATA
0
running>  write-device-reg system.board.fpga.soc_inst.periph_subsys.button_pio.bank.regs.INTERRUPTMASK 1
[system.board.fpga.soc_inst.hps_subsys.agilex_hps.gic.port.spi[49] info] SPI49 already low
running>  @conf.system.board.fpga.soc_inst.periph_subsys.button_pio.port.input_io[0].iface.signal.signal_raise()
[system.board.fpga.soc_inst.hps_subsys.agilex_hps.gic.port.spi[49] info] SPI49 raised
None
running>  read-device-reg system.board.fpga.soc_inst.periph_subsys.button_pio.bank.regs.DATA
1
running>  write-device-reg system.board.fpga.soc_inst.periph_subsys.button_pio.bank.regs.INTERRUPTMASK 0
[system.board.fpga.soc_inst.hps_subsys.agilex_hps.gic.port.spi[49] info] SPI49 lowered
running>  read-device-reg system.board.fpga.soc_inst.periph_subsys.button_pio.bank.regs.DATA
1
Use Case: Exercise USB Disk Hot-Plug
This use case is an extension of the main use case and includes attaching a USB image to one of the USB disks available in the Intel Agilex 5-E Universal virtual platform and exercising the plug-in and plug-out actions as follows:- Boot to the Linux prompt and plug in the USB disk (default), mount the disk and access some of the disk content, and add new content. The disk used in this use case is usb3_disk connected to the USB 3.0 Gen 1 controller.
- Unmount and plug-out the disk, and verify that this is not seen by Linux anymore.
- Plug-in and remount the disk, and verify that the content created is still available.
Setup
Start with the setup as the parent use case an continue with next steps. 1. Create a USB image (usbImage.img) following the instructions at https://askubuntu.com/questions/667291/create-blank-disk-image-for-file-storage. gparted package is needed which you install using sudo apt install gparted.
In this case, you are creating an image of 16 MB and selecting an ext4 type file system in the partition created. Once the image is created, add some initial content (hello1.txt file) by doing the following:
Once you create the (usbImage.img) image, which does not have any content (besides the partition table), add the hello1.txt file by doing:
# Get an empty loopback device X. In this case, loop2 is the 1st empty one.
rolando@rolando2-linux-lab:~/tasks/SimicsEnv/createUSBImage$ losetup
NAME       SIZELIMIT OFFSET AUTOCLEAR RO BACK-FILE                                              DIO LOG-SEC
/dev/loop1         0      0         1  1 /var/lib/snapd/snaps/core20_1822.snap                    0     512
/dev/loop0         0      0         1  1 /var/lib/snapd/snaps/bare_5.snap                         0     512
# Mount the image USB image in this loopback device and observe the partition created is visible
rolando@rolando2-linux-lab:~/tasks/SimicsEnv/createUSBImage$ sudo losetup loop2 usbImage.img
rolando@rolando2-linux-lab:~/tasks/SimicsEnv/createUSBImage$ sudo fdisk -l
Disk /dev/loop2: 16 MiB, 16777216 bytes, 32768 sectors
Units: sectors of 1 * 512 = 512 bytes
Sector size (logical/physical): 512 bytes / 512 bytes
I/O size (minimum/optimal): 512 bytes / 512 bytes
Disklabel type: dos
Disk identifier: 0x1bd5a795

Device       Boot Start   End Sectors Size Id Type
/dev/loop2p1       2048 32767   30720  15M 83 Linux

# Mount the device corresponding to this partition into the Linux file system
rolando@rolando2-linux-lab:~/tasks/SimicsEnv/createUSBImage$ sudo mkdir /media/usbDrive
rolando@rolando2-linux-lab:~/tasks/SimicsEnv/createUSBImage$ sudo mount /dev/loop2p1 /media/usbDrive

# Create an initial file in the USB image
rolando@rolando2-linux-lab:~/tasks/SimicsEnv/createUSBImage$ echo "This is my original file in USB image" > hello1.txt
rolando@rolando2-linux-lab:~/tasks/SimicsEnv/createUSBImage$ sudo cp hello1.txt /media/usbDrive

# Un-mount the image
rolando@rolando2-linux-lab:~/tasks/SimicsEnv/createUSBImage$ sudo umount /media/usbDrive
rolando@rolando2-linux-lab:~/tasks/SimicsEnv/createUSBImage$ sudo losetup -d /dev/loop2
2. Copy the usbImage.img file created to the Simics project directory and update the target script to attach the image to the USB disk.
#uboot-linux_sdcard.simics
$sd_image_filename = "gsrd-console-image-agilex5_devkit.wic"
$fsbl_image_filename = "u-boot-spl-dtb.bin"
$usb3_image_filename = "usbImage.img"
$hps_boot_core = 0
$create_hps_sd_card = TRUE
run-command-file "targets/agilex5e-universal/agilex5e-universal.simics"
Procedure
1. Execute the parent use case to get to the Linux prompt and log in. By default, the USB disks in the virtual platform are plugged in. These can be detected from the Linux using thefdisk -l command and shown next:
root@dhcp0:~# fdisk -l
Disk /dev/mmcblk0: 4096 MB, 4294967296 bytes, 8388608 sectors
:
Device       Boot StartCHS    EndCHS        StartLBA     EndLBA    Sectors  Size Id Type
/dev/mmcblk0p1 *  16,0,1      1023,3,32         2048    1026047    1024000  500M  b Win95 FAT32
/dev/mmcblk0p2    1023,3,32   1023,3,32      1026048    4098047    3072000 1500M 83 Linux
Disk /dev/sda: 1024 GB, 1099511627776 bytes, 2147483648 sectors
133674 cylinders, 255 heads, 63 sectors/track
Units: sectors of 1 * 512 = 512 bytes

Disk /dev/sda: 16 MB, 16777216 bytes, 32768 sectors
256 cylinders, 64 heads, 2 sectors/track
Units: sectors of 1 * 512 = 512 bytes

Device  Boot StartCHS    EndCHS        StartLBA     EndLBA    Sectors  Size Id Type
/dev/sda1    4,4,1       64,63,2           2048      32767      30720 15.0M 83 Linux
Partition 1 has different physical/logical start (non-Linux?):
     phys=(4,4,1) logical=(16,0,1)
Partition 1 has different physical/logical end:
     phys=(64,63,2) logical=(255,63,2)

Disk /dev/sdb: 1024 GB, 1099511627776 bytes, 2147483648 sectors
133674 cylinders, 255 heads, 63 sectors/track
Units: sectors of 1 * 512 = 512 bytes

Disk /dev/sdb doesn't contain a valid partition table
2. Observe that the USB disks correspond to the /dev/sda, /dev/sdb devices. The usb3_disk corresponds to the /dev/sda device and /dev/sdca corresponds to the partition created in this disk.
3. Mount the partition in usb3_disk, observe the content (hello1.txt file), add new content (hello2.txt), and unmount the disk.
root@dhcp0:~# mkdir /media/usbDrive
root@dhcp0:~# mount /dev/sda1 /media/usbDrive
[  680.753967] EXT4-fs (sda1): mounted filesystem with ordered data mode. Quota mode: none.
root@dhcp0:~# ls /media/usbDrive
hello1.txt
root@dhcp0:~# more /media/usbDrive/hello1.txt
This is my original file in USB image
root@dhcp0:~# echo "This is my new file in the USB image" > /media/usbDrive/hello2.txt
root@dhcp0:~# ls /media/usbDrive
hello1.txt  hello2.txt
root@dhcp0:~# umount /media/usbDrive/
[ 2403.043825] EXT4-fs (sda1): unmounting filesystem.
4. Unplug the usb3_disk from the Simics CLI and observe that Linux detects this action.
In Simics CLI:
running> system.board.usb3_disk.unplugIn Linux shell:
root@dhcp0:~#
[ 1115.122439] usb 3-1: USB disconnect, device number 2
You can call
fdisk -l command again to observe that /dev/sda device is no longer present.
5. From the Simics CLI plugin, the usb3_disk again provides the usb3 port. Observe in the Linux shell that the device connection is detected. Remount the device partition and confirm that the new content created before is still present.
Finally, unmount the disk.In Simics CLI:
running> system.board.usb3_disk.plug port = usb1_typec
[system.board.fpga.soc_inst.hps_subsys.agilex_hps.usb31.host.bank.xhci_regs spec-viol] Writing 1 to xhci_regs.USBCMD.Rs while xhci_regs.USBSTS.Hch is 1
[system.board.fpga.soc_inst.hps_subsys.agilex_hps.usb31.host.bank.xhci_regs spec-viol] Writing 1 to xhci_regs.USBCMD.Rs while xhci_regs.USBSTS.Hch is 1
In Linux shell:
root@dhcp0:~#
[ 1627.451509] usb 3-1: new !SuperSpeed USB device number 3 using xhci-hcd
[ 1627.471599] usb 3-1: LPM exit latency is zeroed, disabling LPM.
[ 1627.476051] usb-storage 3-1:1.0: USB Mass Storage device detected
[ 1627.485673] scsi host2: usb-storage 3-1:1.0
:
root@dhcp0:~# fdisk -l
:
Disk /dev/sda: 16 MB, 16777216 bytes, 32768 sectors
256 cylinders, 64 heads, 2 sectors/track
Units: sectors of 1 * 512 = 512 bytes

Device  Boot StartCHS    EndCHS        StartLBA     EndLBA    Sectors  Size Id Type
/dev/sda1    4,4,1       64,63,2           2048      32767      30720 15.0M 83 Linux
root@dhcp0:~# mount /dev/sda1 /media/usbDrive
[ 1920.943231] EXT4-fs (sdc1): mounted filesystem with ordered data mode. Quota mode: none.
root@dhcp0:~# ls  /media/usbDrive
hello1.txt  hello2.txt  lost+found
root@dhcp0:~# more  /media/usbDrive /media/usbDrive/hello2.txt
This is my new file in the USB image
root@dhcp0:~# umount /media/usbDrive/
[ 2403.043825] EXT4-fs (sda1): unmounting filesystem.
Use Case: Exercise UBIFS QSPI Boot Flow from FSBL to Linux
This use case consists of booting from a QSPI flash device going from U-Boot to Linux prompt passing through U-Boot SPL → ATF → U-Boot → Linux using an image with UBIFS format.Setup
Perform steps 1 to 4 described in the Simulation Setup section. 5. In the Intel Simics environment at the project directory, generate a compressed version of the .rpd file created (.craff) file using the craff tool provided under the Simics Base installation directory:SimicsInstallDir/simics-6.0.183/bin/craff -o qspi_image.img.craff flash_image_jic.rpdThe following file is created under the Simics project directory:
- qspi_image.img.craff
#uboot-linux_qspi.simics
$fsbl_image_filename = "u-boot-spl-dtb.bin"
$qspi_image_filename  = "qspi_image.img.craff"
$hps_boot_core = 0
$create_hps_sd_card = FALSE
run-command-file "targets/agilex5e-universal/agilex5e-universal.simics"
Procedure
To exercise this use case, follow the steps below once the Simulation setup is complete: 1. From the project directory, launch the simulation using theuboot-linux_qspi.simics target script. This script launches the simulator and the current terminal becomes the Simics CLI:
$ ./simics uboot-linux_qspi.simics2. From the Simics CLI, start running the simulation with the
run command.
simics> run
3. Wait for the simulation to get to the Linux prompt in the target serial console. 4. Login into the Linux prompt using the root user without a password.
U-Boot SPL 2023.10 (Mar 21 2024 - 07:41:59 +0000) Reset state: Cold MPU 875000 kHz L4 Main 400000 kHz L4 sys free 100000 kHz L4 MP 200000 kHz L4 SP 100000 kHz SDMMC 50000 kHz init_mem_cal: Initial DDR calibration IO96B_0 succeed io96b_mb_init: num_instance 1 io96b_mb_init: get memory interface IO96B 0 io96b_mb_req: Write 0x10001 to IOSSM_CMD_REQ_OFFSET 0x1840043c : DDR: init success QSPI: Reference clock at 400000 kHz Trying to boot from MMC1 MMC: no card present spl: mmc init failed with error: -123 Trying to boot from SPI ## Checking hash(es) for config board-0 … OK ## Checking hash(es) for Image atf … crc32+ OK ## Checking hash(es) for Image uboot … crc32+ OK ## Checking hash(es) for Image fdt-0 … crc32+ OK WARNING: Data cache not enabled NOTICE: BL31: Boot Core = 0 NOTICE: BL31: CPU ID = 81000000 NOTICE: BL31: v2.10.0 (release):QPDS24.1_REL_GSRD_PR NOTICE: BL31: Built : 08:52:03, Mar 21 2024 U-Boot 2023.10 (Mar 21 2024 - 07:41:59 +0000)socfpga_agilex5 CPU: Intel FPGA SoCFPGA Platform (ARMv8 64bit Cortex-A55/A76) Model: SoCFPGA Agilex5 SoCDK DRAM: 2 GiB (effective 8 GiB) Core: 45 devices, 26 uclasses, devicetree: separate WDT: Not starting watchdog@10d00200 WDT: Not starting watchdog@10d00300 WDT: Not starting watchdog@10d00400 WDT: Not starting watchdog@10d00500 WDT: Not starting watchdog@10d00600 NAND: 4096 MiB MMC: mmc0@10808000: 0 Loading Environment from FAT... MMC: no card present ** Bad device specification mmc 0 ** Loading Environment from UBI... SF: Detected mt25qu02g with page size 256 Bytes, erase size 64 KiB, total 256 MiB Warning: MTD name "root" is not unique! Warning: MTD name "root" is not unique! Read 8192 bytes from volume env to 00000000ff8e8700 *** Warning - bad CRC, using default environment : MMC: no card present SF: Detected mt25qu02g with page size 256 Bytes, erase size 64 KiB, total 256 MiB Select Environment on UBI: OK Saving Environment to UBI... done OK UBI partition 'root' already selected UBI partition 'root' already selected No size specified → Using max size (196224) Read 196224 bytes from volume script to 0000000081000000 QSPI: Running script from UBIFS QSPI: Trying to boot script at 0x81000000 ## Executing script at 81000000 crc32+ Trying to boot Linux from device qspi device nor0, # parts = 2 #: name size offset mask_flags 0: u-boot 0x04200000 0x00000000 0 1: root 0x0be00000 0x04200000 0 device nand0 , # parts = 2 #: name size offset mask_flags 0: u-boot 0x00200000 0x00000000 0 1: nand_root 0x1f400000 0x00200000 0 active partition: nor0,0 - (u-boot) 0x04200000 @ 0x00000000 : Enabling QSPI at Linux DTB... Working FDT set to ff8d9000 QSPI clock frequency updated RSU: Firmware or flash content not supporting RSU RSU: Firmware or flash content not supporting RSU RSU: Firmware or flash content not supporting RSU RSU: Firmware or flash content not supporting RSU Starting kernel … Deasserting all peripheral resets [ 0.000000] Booting Linux on physical CPU 0x0000000000 [0x412fd050] [ 0.000000] Linux version 6.1.68-altera (oe-user@oe-host) (aarch64-poky-linux-gcc (GCC) 13.2.0, GNU ld (GNU Binutils) 2.41.0.20231213) #1 SMP PREEMPT Thu Mar 28 07:56:27 UTC 2024 [ 0.000000] Machine model: SoCFPGA Agilex5 SoCDK : [ 150.205291] devtmpfs: mounted [ 150.209803] Freeing unused kernel memory: 7744K [ 150.210353] Run /sbin/init as init process [ 169.405413] systemd[1]: System time before build time, advancing clock. [ 175.713591] systemd[1]: systemd 254.4^ running in system mode (-PAM -AUDIT -SELINUX -APPARMOR +IMA -SMACK +SECCOMP -GCRYPT -GNUTLS -OPENSSL +ACL +BLKID -CURL -ELFUTILS -FIDO2 -IDN2 -IDN -IPTC +KMOD -LIBCRYPTSETUP +LIBFDISK -PCRE2 -PWQUALITY -P11KIT -QRENCODE -TPM2 -BZIP2 -LZ4 -XZ -ZLIB +ZSTD -BPF_FRAMEWORK +XKBCOMMON +UTMP +SYSVINIT default-hierarchy=hybrid) [ 175.825328] systemd[1]: Detected architecture arm64. Welcome to Poky (Yocto Project Reference Distro) 4.3.4 (nanbield)! [ 176.961376] systemd[1]: Hostname set to . [ 177.297357] systemd[1]: Initializing machine ID from random generator. [ 202.142091] systemd[1]: Queued start job for default target Multi-User System. : [ 283.261672] socfpga-dwmac 10830000.ethernet eth1: Register MEM_TYPE_PAGE_POOL RxQ-0 [ 283.264087] socfpga-dwmac 10830000.ethernet eth1: Register MEM_TYPE_PAGE_POOL RxQ-1 [ 283.266624] socfpga-dwmac 10830000.ethernet eth1: Register MEM_TYPE_PAGE_POOL RxQ-2 [ 283.269140] socfpga-dwmac 10830000.ethernet eth1: Register MEM_TYPE_PAGE_POOL RxQ-3 [ 283.271680] socfpga-dwmac 10830000.ethernet eth1: Register MEM_TYPE_PAGE_POOL RxQ-4 [ 283.274194] socfpga-dwmac 10830000.ethernet eth1: Register MEM_TYPE_PAGE_POOL RxQ-5 [ 283.276690] socfpga-dwmac 10830000.ethernet eth1: Register MEM_TYPE_PAGE_POOL RxQ-6 [ 283.279254] socfpga-dwmac 10830000.ethernet eth1: Register MEM_TYPE_PAGE_POOL RxQ-7 [ 283.341288] socfpga-dwmac 10830000.ethernet eth1: PHY [stmmac-2:00] driver [Marvell 88E1510] (irq=POLL) [ 283.342297] socfpga-dwmac 10830000.ethernet eth1: No Safety Features support found [ 283.443145] socfpga-dwmac 10830000.ethernet eth1: IEEE 1588-2008 Advanced Timestamp supported [ 283.444197] socfpga-dwmac 10830000.ethernet eth1: registered PTP clock [ 283.444965] socfpga-dwmac 10830000.ethernet eth1: FPE workqueue start [ 283.445669] socfpga-dwmac 10830000.ethernet eth1: configuring for phy/rgmii link mode [ 283.446598] socfpga-dwmac 10830000.ethernet eth1: Link is Up - 1Gbps/Full - flow control rx/tx [ 283.446775] 8021q: adding VLAN 0 to HW filter on device eth1 [ 283.448325] IPv6: ADDRCONF(NETDEV_CHANGE): eth1: link becomes ready [ 313.557300] audit: type=1334 audit(1695209148.196:10): prog-id=12 op=UNLOAD [ 313.558040] audit: type=1334 audit(1695209148.196:11): prog-id=11 op=UNLOAD dhcp0 login: root root@dhcp0:~#
Use Case: Exercise NAND Boot Flow from FSBL to Linux
This use case consists of booting from a NAND flash device going from U-Boot to Linux prompt passing through U-Boot SPL → ATF → U-Boot → Linux.Setup
Perform steps 1 to 4 described in the Simulation Setup section. 5. In the Intel Simics environment at the project directory, create a customized target script to exercise the FSBL to Linux boot flow from NAND device. The file to create is called uboot-linux_nand.simics. This file will look like this:#uboot-linux_nand.simics $fsbl_image_filename = "u-boot-spl-dtb.bin" $nand_data_image_filename = "nand.img" $hps_boot_core = 0 $create_hps_sd_card = FALSE run-command-file "targets/agilex5e-universal/agilex5e-universal.simics"
Procedure
To exercise this use case, follow the below steps once the Simulation setup is complete: 1. From the project directory, launch the simulation using theuboot-linux_nand.simics target script. This script launches the simulator and the current terminal becomes the Simics CLI:
$ ./simics uboot-linux_nand.simics2. From the Simics CLI, start running the simulation with the
run command.
simics> run
3. Wait for the simulation to get to the Linux prompt in the target serial console. 4. Login into the Linux prompt using the root user without a password.
U-Boot SPL 2023.10 (Mar 21 2024 - 07:41:59 +0000) Reset state: Cold MPU 875000 kHz L4 Main 400000 kHz L4 sys free 100000 kHz L4 MP 200000 kHz L4 SP 100000 kHz SDMMC 50000 kHz init_mem_cal: Initial DDR calibration IO96B_0 succeed io96b_mb_init: num_instance 1 io96b_mb_init: get memory interface IO96B 0 io96b_mb_req: Write 0x10001 to IOSSM_CMD_REQ_OF : DDR: init success QSPI: Reference clock at 400000 kHz Trying to boot from MMC1 MMC: no card present spl: mmc init failed with error: -123 Trying to boot from SPI Trying to boot from NAND ## Checking hash(es) for config board-0 … OK ## Checking hash(es) for Image atf … crc32+ OK ## Checking hash(es) for Image uboot … crc32+ OK ## Checking hash(es) for Image fdt-0 … crc32+ OK WARNING: Data cache not enabled NOTICE: BL31: Boot Core = 0 NOTICE: BL31: CPU ID = 81000000 NOTICE: BL31: v2.10.0 (release):QPDS24.1_REL_GSRD_PR NOTICE: BL31: Built : 08:52:03, Mar 21 2024 U-Boot 2023.10 (Mar 21 2024 - 07:41:59 +0000)socfpga_agilex5 CPU: Intel FPGA SoCFPGA Platform (ARMv8 64bit Cortex-A55/A76) Model: SoCFPGA Agilex5 SoCDK DRAM: 2 GiB (effective 8 GiB) Core: 45 devices, 26 uclasses, devicetree: separate WDT: Not starting watchdog@10d00200 WDT: Not starting watchdog@10d00300 WDT: Not starting watchdog@10d00400 WDT: Not starting watchdog@10d00500 WDT: Not starting watchdog@10d00600 NAND: 4096 MiB MMC: mmc0@10808000: 0 : Hit any key to stop autoboot: 0 MMC: no card present SF: Detected mt25qu02g with page size 256 Bytes, erase size 64 KiB, total 256 MiB Select Environment on UBI: OK Saving Environment to UBI... ubi0 error: ubi_read_volume_table: the layout volume was not found ubi0 error: ubi_attach_mtd_dev: failed to attach mtd3, error -22 UBI error: cannot attach mtd3 UBI error: cannot initialize UBI, error -22 UBI init error 22 Please check, if the correct MTD partition is used (size big enough?) ** Cannot find mtd partition "root" Failed (1) QSPI: Trying to boot script at 0x81000000 ## Executing script at 81000000 Wrong image format for "source" command QSPI: SCRIPT FAILED: continuing... Select Environment on UBI: OK Saving Environment to UBI... done OK UBI partition 'root' already selected No size specified → Using max size (1032192) Read 1032192 bytes from volume script to 0000000081000000 NAND: Trying to boot script at 0x81000000 ## Executing script at 81000000 crc32+ Trying to boot Linux from device nand Select Environment on UBI: OK Saving Environment to UBI... UBI partition 'root' already selected done OK : Enabling QSPI at Linux DTB... Working FDT set to ff8d9000 QSPI clock frequency updated RSU: Firmware or flash content not supporting RSU RSU: Firmware or flash content not supporting RSU RSU: Firmware or flash content not supporting RSU RSU: Firmware or flash content not supporting RSU Starting kernel … Deasserting all peripheral resets [ 0.000000] Booting Linux on physical CPU 0x0000000000 [0x412fd050] [ 0.000000] Linux version 6.1.68-altera (oe-user@oe-host) (aarch64-poky-linux-gcc (GCC) 13.2.0, GNU ld (GNU Binutils) 2.41.0.20231213) #1 SMP PREEMPT Thu Mar 28 07:56:27 UTC 2024 [ 0.000000] Machine model: SoCFPGA Agilex5 SoCDK : [ 1.085020] systemd[1]: Detected architecture arm64. Welcome to Poky (Yocto Project Reference Distro) 4.3.4 (nanbield)! [ 1.160343] systemd[1]: Hostname set toNote: Most of the same use cases that are exercised from the Exercise SDCard Boot Flow from FSBL to Linux use case can also be exercised from this use case. There are some exceptions due to the limitation in the size of the file system which does not support the required commands.. [ 1.161401] systemd[1]: Initializing machine ID from random generator. : [ 5.692488] socfpga-dwmac 10810000.ethernet eth1: Link is Up - 1Gbps/Full - flow control rx/tx [ 5.693302] 8021q: adding VLAN 0 to HW filter on device eth1 [ 5.708322] socfpga-dwmac 10830000.ethernet eth1: Register MEM_TYPE_PAGE_POOL RxQ-0 [ 5.710830] socfpga-dwmac 10830000.ethernet eth1: Register MEM_TYPE_PAGE_POOL RxQ-1 [ 5.713543] socfpga-dwmac 10830000.ethernet eth1: Register MEM_TYPE_PAGE_POOL RxQ-2 [ 5.716106] socfpga-dwmac 10830000.ethernet eth1: Register MEM_TYPE_PAGE_POOL RxQ-3 [ 5.718601] socfpga-dwmac 10830000.ethernet eth1: Register MEM_TYPE_PAGE_POOL RxQ-4 [ 5.721228] socfpga-dwmac 10830000.ethernet eth1: Register MEM_TYPE_PAGE_POOL RxQ-5 [ 5.723743] socfpga-dwmac 10830000.ethernet eth1: Register MEM_TYPE_PAGE_POOL RxQ-6 [ 5.726325] socfpga-dwmac 10830000.ethernet eth1: Register MEM_TYPE_PAGE_POOL RxQ-7 [ 5.791873] socfpga-dwmac 10830000.ethernet eth1: PHY [stmmac-2:01] driver [Marvell 88E1510] (irq=POLL) [ 5.792979] socfpga-dwmac 10830000.ethernet eth1: No Safety Features support found [ 5.893847] socfpga-dwmac 10830000.ethernet eth1: IEEE 1588-2008 Advanced Timestamp supported [ 5.894906] socfpga-dwmac 10830000.ethernet eth1: registered PTP clock [ 5.897577] socfpga-dwmac 10830000.ethernet eth1: FPE workqueue start [ 5.898262] socfpga-dwmac 10830000.ethernet eth1: configuring for phy/rgmii link mode [ 5.899965] 8021q: adding VLAN 0 to HW filter on device eth1 [ OK ] Started Hostname Service. [ OK ] Finished Intel SoCFPGA GSRD initialization. [ OK ] Reached target Multi-User System. Starting Record Runlevel Change in UTMP... [ OK ] Finished Record Runlevel Change in UTMP. Poky (Yocto Project Reference Distro) 4.3.4 dhcp0 ttyS0 dhcp0 login: root root@dhcp0:~#
Use Case: Debug Bare-Metal Code Using Intel Simics Simulator
This use case consists of performing a debug session in a bare-metal environment, which in this case corresponds to a U-Boot application example. In this use case, debugging is performed using only the Simics CLI commands allowing us to navigate on the source code of the application, advance in the execution of this, and observe and modify values of variables. The application is created in the form of a U-Boot command (helloTestApp) that should be executed from the U-Boot shell. The application starts by printing a hello message (Hello Intel SoC FPGA!) and printing the number of times the command has been executed since the last power-up. After this, the application enters into a loop in which it waits for 100 sec and increases an iteration counter by one. The content on the loop is executed as long as the iterator counter is lower than 100000 and also the value of theexitVar variable remains in 0, otherwise, it leaves the loop and continues printing the number of times the content of the loop was executed. After this, the code performs some mathematical operations involving the iterator value and other variables and finally prints the result of the final operation.
The source code of the application is shown next. This is included in the do_helloTestApp() function, which then is referenced in the U_BOOT_CMD macro, which converts this into a U-Boot command. This source code must be included in a new file under the U-Boot repository as cmd/socFPGATrainingExamples.c. Also, to be built as part of the U-Boot binaries, update the cmd/Makefile file by adding obj-y + socFPGATrainingExamples.o=.
/*
   Training Examples called from a command from U-Boot shell
*/

#include <stdio.h>
#include <command.h>
#include <linux/delay.h>

static char helloTestCmd_help_text[] =
   "helloTestApp\t\n";

static unsigned int execCount = 0;

static int do_helloTestApp(struct cmd_tbl *cmdtp, int flag, int argc, char *const argv[])
{
   volatile unsigned char exitVar = 0;
   unsigned int waitIter = 0;
   volatile unsigned int myVarA = 0;
   unsigned int temp = 0;
   unsigned int result;

   if (argc > 1)
   {
      return CMD_RET_USAGE;
   }

   printf("Hello Intel SoC FPGA! \r\n");
   execCount++;
   printf("Executed %d times \r\n", execCount);
   printf("Relocated address of do_helloTestApp: %p and execCount: %p \r\n", &do_helloTestApp, &execCount);

   while ((exitVar == 0) && (waitIter < 100000)){
       udelay(100);
       waitIter++;
   }

   printf("Exit from loop at iteration: %d \r\n", waitIter);

   temp = waitIter + myVarA;
   result = temp % 1000;

   printf("Final result: %d \r\n", result);

   return CMD_RET_SUCCESS;
}

U_BOOT_CMD(
   helloTestApp, 1, 1, do_helloTestApp,
   "Command used to launch hello application", helloTestCmd_help_text
);
Note: You can perform the build of this application by updating the Yocto recipe. This can be done by creating a patch in which you describe the files that need to be created/updated in the U-Boot repository and then deploy it. This can be done during the Yocto customization stage (Customize Yocto Build). To create the u-boot patch (myUbootExampleApp.patch), do the following:
cd $TOP_FOLDER
git clone -b QPDS24.1_REL_GSRD_PR https://github.com/altera-opensource/u-boot-socfpga u-boot-socfpga-patch
cd u-boot-socfpga-patch/
 - Create cmd/socFPGATrainingExamples.c file with the source code provided of the example application.
 - Edit cmd/Makefile to include the build of socFPGATrainingExamples.c

    obj-y += help.o
    obj-y += panic.o
    obj-y += version.o
    obj-y += socFPGATrainingExamples.o

git add cmd/Makefile cmd/socFPGATrainingExamples.c
git diff --patch --staged > myUbootExampleApp.patch
To deploy the patch in the Yocto build flow do the following: 1. Copy the patch file to the
$TOP_FOLDER/gsrd-socfpga/meta-intel-fpga-refdes/recipes-bsp/u-boot/files/ directory (myUbootExampleApp.patch).2. Request to deploy the path by adding a patch to the
$TOP_FOLDER/gsrd-socfpga/meta-intel-fpga-refdes/recipes-bsp/u-boot/u-boot-socfpga_%.bbappend file:
SRC_URI:append = " \
        file://0001-arm-Add-dwarf-4-to-compilation-flag.patch \
        file://0001-arm-agilex-add-board-configuration.patch \
        file://0001-arm-stratix10-add-board-configuration.patch \
        file://myUbootExampleApp.patch \
        "
3. Continue with the rest of the Yocto build flow indicated at Build Yocto section.
After these steps, the application is included in the U-Boot binary file (uboot.itb), which is part of the SDCard image created (gsrd-console-image-agilex5_devkit.wic) and a symbol file corresponding to the U-Boot image, located at $TOP_FOLDER/gsrd-socfpga/agilex5_devkit-gsrd-images/u-boot-agilex5_devkit-socdk-gsrd-atf/u-boot. The symbol file is used later during the setup of the debug session.
Setup
Start with the setup of the main use case defined at Simulation Setup. Modify the target script to add the created symbol file and set a breakpoint at the entry point of thedo_helloTestApp function as indicated in the following:
# uboot-linux_sdcard.simics
:
add-symbol-file  <path of symbol file>/u-boot  0x7FAF2000 -relative
bp.source_location.break do_helloTestApp
Note: The symbol file is being loaded with an offset relocation of 0x7FAF2000. This is needed because in a late stage of the U-Boot execution, this relocates itself into a different SDRAM memory location and this should be indicated to the debugger, so there is a match between the addresses indicated in the symbol file and the real memory address location of the symbols. You can obtain this relocation offset by subtracting the real address of a specific function (which can be obtained from the application being executed) and the original offset from the same function in the symbols file (provided in the
u-boot.sym file). This is shown in the following figure:

Procedure
- Start the simulation similar to how it is done in the main use case, but in the serial console stop the U-Boot autoboot by pressing a key on the reception of the message "Hit any key to stop autoboot:". 2
- Start the U-Boot example application by calling the
helloTestAppcommand from the U-Boot shell. This will make the breakpoint set in the target script trigger and the simulation will be stopped. In the Simics CLI, you will see the following message:[tcf] Breakpoint 1 on execution in context board.fpga.soc_inst.hps_subsys.agilex_hps.core[0]
- From Simics CLI, start a debug session by calling the following command:
simics> (psel).debug
 dbg0 (the arm-cortex-a55 system.board.fpga.soc_inst.hps_subsys.agilex_hps.core[0]) Now debugging the arm-cortex-a55 system.board.fpga.soc_inst.hps_subsys.agilex_hps.core[0]
 do_helloTestApp(cmdtp=(struct cmd_tbl *) 0xfffc5788, flag=0, argc=1, argv=(char * const *) 0xffb09520) at
/home/tasks/gsrd/agilex5/updateUbootApp/agilex5_gsrd/gsrd-socfpga/agilex5_devkit-gsrd-rootfs/tmp/work/agilex5-poky-linux/u-boot-socfpga/1_v2022.10+gitAUTOINC+59fa161039-r0/git/cmd/socFPGATrainingExamples.c:19 19 volatile unsigned char exitVar = 0; - Following the program's logic, if the value of
exitVarstays zero and the program is continued, the loop will continue until it reaches 100,000 and then the program ends with output messages in the serial console. You can check the values of the variable using thesym-typeandsym-valuefeatures:simics> dbg0.sym-type exitVar
volatile unsigned char
simics> dbg0.sym-value exitVar
0 '\x00'
simics> dbg0.sym-type myVarA
volatile unsigned int-
simics> dbg0.sym-value myVarA
0 - Control the program by using breakpoint and value modification. In this section, first insert a breakpoint at Line 34, which is in the loop (You may let the program run for a few seconds before inserting this breakpoint). With that, expect the program to pause when the breakpoint is met and modify the value of
exitVar.//The loop conditions are exitVar and waitIter
In the Simics Serial Console, enter the following line to insert the breakpoint at Line 34:
32| while ((exitVar == 0) && (waitIter < 100000)){
33| udelay(100);
34| waitIter++;
35| }running> bp.source_line.break filename=socFPGATrainingExamples.c line-number=34
As the breakpoint is planted, continue the program by entering run. The program will stop when the breakpoint is hit. When the program stopped, modify the value of
Breakpoint 2: 0x2 (planted)exitVar- modify the value ofexitVarin the Serial Console by using thesym-writefeature.simics> dbg0.sym-write exitVar 1
Next, enter
exitVar = 1 '\x01'
simics> runrunand see the program ends immediately due toexitVar=1.SOCFPGA_AGILEX5 # helloTestApp
From the output print, it shows that the program iterated for 9691 loops before hitting the Line-34 breakpoint you planted, this number would be bigger if you waited longer before planting the breakpoint. Lastly, the modification of
Hello Intel SoC FPGA!
Executed 1 times
Relocated address of do_helloTestApp: 00000000fff1a7a8 and execCount: 00000000fffddba0
Exit from loop at iteration: 9691
Final result: 691
SOCFPGA_AGILEX5 #exitVarended the program.- Note
- a) You can modify the value of
myVarAandexitVarat any time before the looping ends (The test program ends after 99,999 loops).
b) If the loop-ending condition (myVarAandexitVar) changed, the program should exit in the nextrun.
c) Using the same Simics session, you can enterhelloTestAppin U-boot Shell to restart the test program again.
- For the first time the program is executed, the output shows “Executed 1 times”, this value will increase (+1) as you run the program again without ending the Simics session. Meanwhile, in the serial console, the program has ended as soon as it just started because the controlling variable
exitVar, having a value of 1, already reached the loop-ending condition. Output on a serial console:SOCFPGA_AGILEX5 # helloTestApp
Hello Intel SoC FPGA!
Executed 1 times
Relocated address of do_helloTestApp: 00000000fff1a7a8 and execCount: 00000000fffddba0
Exit from loop at iteration: 2
Final result: 2
SOCFPGA_AGILEX5 # - If the value
exitVarremained zero, the loop counter is allowed to run for 99,999 loops. While the program is looping, you may change the value ofmyVarAto ‘345’. The Final result will be 345 when the looping ends. Final result is the modulus value where the Final result = ( (waitIter + myVarA) % 1000 )SOCFPGA_AGILEX5 # helloTestApp
Hello Intel SoC FPGA!
Executed 2 times
Relocated address of do_helloTestApp: 00000000fff1a7a8 and execCount: 00000000fffddba0
Exit from loop at iteration: 100,000
Final result: 345
SOCFPGA_AGILEX5 # - If both values of
exitVarandmyVarAremain unchanged, both being zero respectively, the looping continues until it reaches waitIter = 100,000. When the program ends, the Final result would be zero.SOCFPGA_AGILEX5 # helloTestApp
Hello Intel SoC FPGA!
Executed 1 times
Relocated address of do_helloTestApp: 00000000fff1a7a8 and execCount: 00000000fffddba0
Exit from loop at iteration: 100,000
Final result: 0
SOCFPGA_AGILEX5 #
Use Case: Debug Bare-metal Code Using Simics-RiscFree
This use case is an extension to the use case in section Use Case: Debug Bare-metal Code Using Intel Simics Simulator above but the debugging steps are performed in the Simics-RiscFree IDE. The test program used here is the samehelloTestApp.c.
Important: The offset relocation of 0x7FAF2000 in the symbol file is still required and must be done before the symbol file is used to launch Simics-RiscFree.
Setup
This section requires thesimics-riscfree script. It is included in your Intel Simics Simulator project directory.
(1) To launch Simics-RiscFree IDE, use this command: $ ./simics-riscfree(2) Following the command, you must set up a RiscFree workspace. You should use a new directory as a RiscFree workspace different from the Simics project directory.
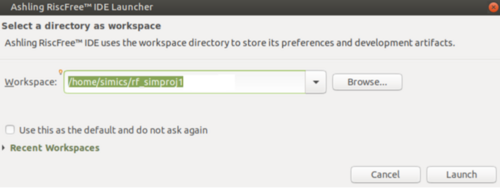
(3) In the RiscFree IDE GUI launched, you should see the current Simics project you selected shown in the Project Explorer window. If this is not shown, you can open it from "Window > Show View > Project Explorer" menu.
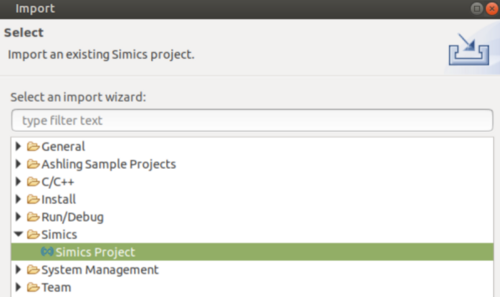
(4) From the Project Explorer window, right-click on the target script you want to launch (uboot-linux_sdcard.simics) and select “Debug As > Simics Session”.
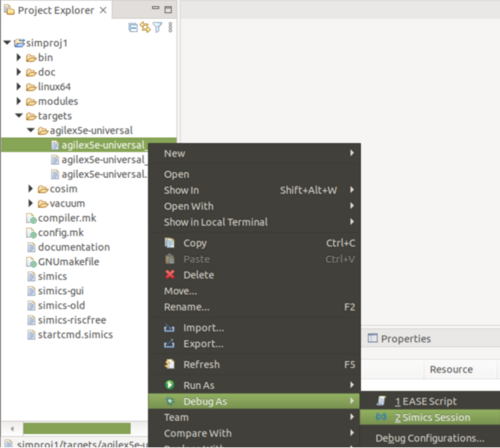
(5) When prompted for Switching Perspective, select Yes. The interface switches to the RiscFree Debugger, which is more user-friendly for debugging.
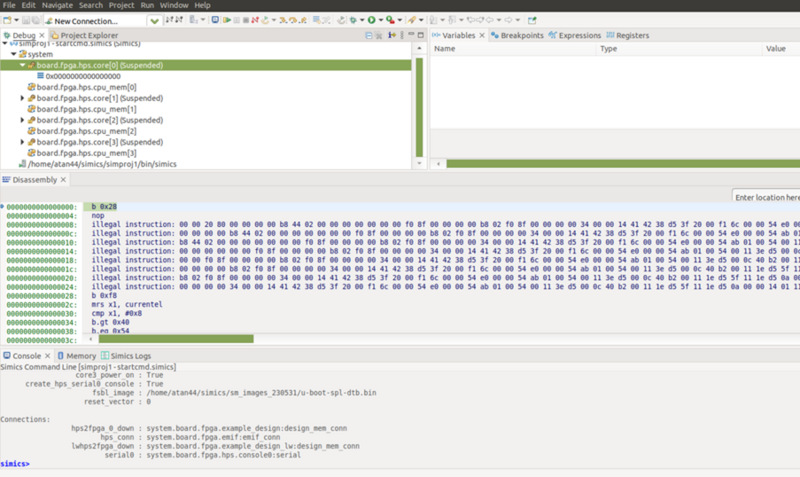
Procedure
1. In the RiscFree Debugger window, click on theRun button 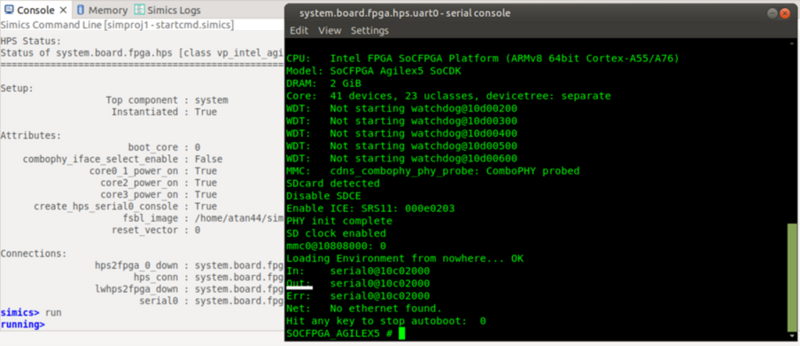
3. Start the test program by entering “helloTestApp” in the U-boot Shell.
SOCFPGA_AGILEX5 # helloTestApp
simics>4. As the first breakpoint is met, the program is halted at the entry point of the
[tcf] Breakpoint 1 on execution in context board.fpga.soc_inst.hps_subsys.agilex_hps.core[0]
do_helloTestApp() function. Use the step into/step-over buttons while ((exitVar = 0) && (waitIter < 100000))= line and show a capture of this with list command.
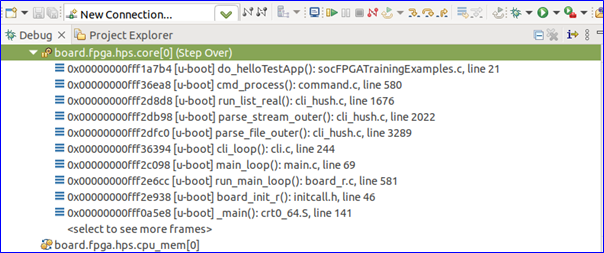 5. At this point, if you click on the
 Run button, the test program prints “Hello Intel SoC FPGA!” and finishes looping after some time.

Note: If the loop already ended, relaunch the test program "helloTestApp" to proceed to the next step. 6. To modify the loop conditions for debugging purposes, you can modify the value of
exitVar in the Variable window. For example, changing the value of exitVar from ‘\377’ (this is a random value assigned by the system) to ‘\001’. As exitVar is no longer zero, the condition of the loop is exceeded, and thus the looping ends.
Before modification:
 After modification:
 7. The loop exits depending on two conditions:
 exitVar not equals to zero AND waitIter reached 100,000. As the value of exitVar is modified to 1 in the middle of looping, the loop ends with exitVar = 1 AND waitIter at any number less than 100,000. In this example, waitIter is 82251 when the loop ends.
Following the code logic, Final result is the modulus value where Final result = ( (waitIter + myVarA) % 1000 ) = 252
Use Case: Remote Debugging of a Linux User Mode Program Using ARM DS Debugger
This use case is an extension of the Use Case: Exercise SDCard Boot Flow from FSBL to Linux and consists of performing a debug session in a Linux user mode application using ARM Development Studio. For this, the debugging is done using the GDB server running in the target system. Also, set up the Simics network connectivity with the host PC, which is the one that runs ARM DS through TCP protocol. The application to be debugged is listed next (myArmDSDebugExample.c). This application determines the core in which this run started and then enters into a loop counting the number of times the loop is executed and continue observing the execution core. It also counts the number of times the application is executed in each one of the four cores. The application exits from the loop when the iterator reaches a limit or theexitVar variable has a value of '1', which normally never should occur. After the loop, the application assigns the value in x variable to the a and b variables and then adds these variables and assigns the result value in
c variable. In the end, the application prints the result of the addition, the number of times the loop was iterated and the final value of exitVar, and the number of times each core executed the application.
#define _GNU_SOURCE

#include <stdio.h>

#define NUM_CORES 4
unsigned int coreCount[NUM_CORES];

unsigned long int read_mpidr(void)
{
    unsigned long int value;
    asm volatile("mrs %[result], mpidr_el1" : [result] "=r" (value));
    return value;
}

unsigned int getCore(){
   static unsigned int corePrev = (unsigned int)(-1);
   unsigned long mpidr;
   unsigned int core;

    mpidr = read_mpidr();
    core = (mpidr >> 8) & 0xFF;
    if (core != corePrev)
    {
       coreCount[core]++;
       corePrev = core;
    }

    return core;
}

int main()
{

    int x = 1000;
    unsigned int core;
    unsigned int iter = 0;
    int a;
    int b;
    int c;
    volatile int exitVar = 0;

    core = getCore();
    printf("=== My Debug example started on Core %d ===\n", core);

    while((exitVar==0) && (iter < 1000000000))
    {
        core = getCore();
        iter++;
    }
    a = x;
    b = x;
    c = a + b;
    printf("Count:%d  iter: %d  exitVar:%d \n", c, iter, exitVar);
    for (core = 0; core < NUM_CORES; core++)
        printf("  core[%d]: %d times\r\n", core, coreCount[core]);

    return 0;
}
Setup
1. Start with the setup as the parent use case. From the Simics CLI or from theuboot-linux_sdcard.simics Simics script, add the network configuration that allows establishing the GDB server connexion between the target system and the host PC. This configuration creates an incoming forwarding port for TCP traffic from a port in the host PC to port 9123 in the target system. The port in the host PC is shown when calling the list-port-forwarding-setup command (port 4001 will be used in this example).
# uboot-linux_sdcard.simics
:
connect-real-network-port-in 9123 ethernet-link = ethernet_switch0 target-ip = 10.10.0.100 -tcp
list-port-forwarding-setup
running>  list-port-forwarding-setup
NAPT enabled with gateway 10.10.0.1/24 on link ethernet_switch0.link.
NAPT enabled with gateway fe80::2220:20ff:fe20:2000/64 on link ethernet_switch0.link.

Real DNS enabled at 10.10.0.1/24 on link ethernet_switch0.link.
Real DNS enabled at fe80::2220:20ff:fe20:2000/64 on link ethernet_switch0.link.

Host TCP port 4001 → 10.10.0.100:9123
2. The Linux example application must be compiled so you can have the executable binary available. This binary is generated with a toolchain and should be built to include debug information (i.e. symbol file). ARM DS does not support the DWARF 5.0 format in the symbols files, so the application must be built with a toolchain that creates this with DWARF 4.0 version. The instructions to build the applications are shown next. This generates the
myArmDSDebugExample binary.
mkdir SymDbg && cd SymDbg
wget https://developer.arm.com/-/media/Files/downloads/gnu-a/10.2-2020.11/binrel/gcc-arm-10.2-2020.11-x86_64-aarch64-none-linux-gnu.tar.xz
tar xf gcc-arm-10.2-2020.11-x86_64-aarch64-none-linux-gnu.tar.xz
rm gcc-arm-10.2-2020.11-x86_64-aarch64-none-linux-gnu.tar.xz

./gcc-arm-10.2-2020.11-x86_64-aarch64-none-linux-gnu/bin/aarch64-none-linux-gnu-gcc -g -o  myArmDSDebugExample myArmDSDebugExample.c
Procedure
1. Execute parent use case to get to the Linux prompt and log in. 2. Take the Linux application binary to the target system filesystem using tftp. For this, you will need to do the following. The myArmDSDebugExample binary should be located in the Simics project directory before callingtftp command.
root@dhcp0:~# ethtool -K eth1 tx off
tx-checksum-ipv4: off
tx-checksum-ipv6: off
tx-tcp-segmentation: off [not requested]
tx-tcp6-segmentation: off [not requested]
root@dhcp0:~# tftp -gr myArmDSDebugExample 10.10.0.1
root@dhcp0:~# chmod +x myArmDSDebugExample
3. Start a GDB Server debug session over the application from the Linux prompt using the port created in the target system during the port forwarding setup:
root@dhcp0:~# gdbserver 10.10.0.1:9123 myArmDSDebugExample
Process /home/root/myArmDSDebugExample created; pid = 283
Listening on port 9123
4. In ARM Development Studio, create a new debug connection following the next steps:
a) Create a New Debug Connection to a Linux Application Connection:
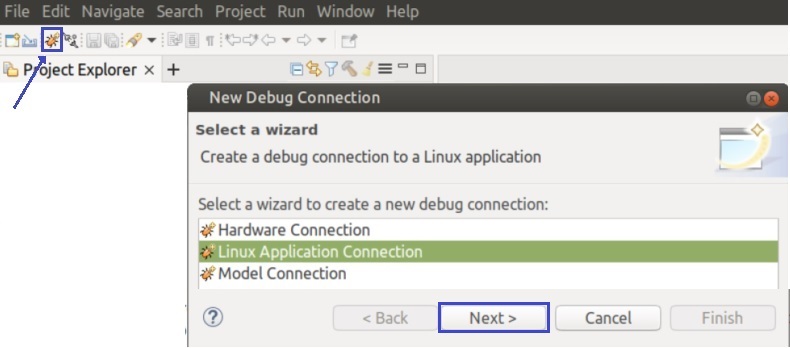 Press Next.
b) Give a name to the Debug connection: DebugLinuxAppSimicsGDB . Press Finish.
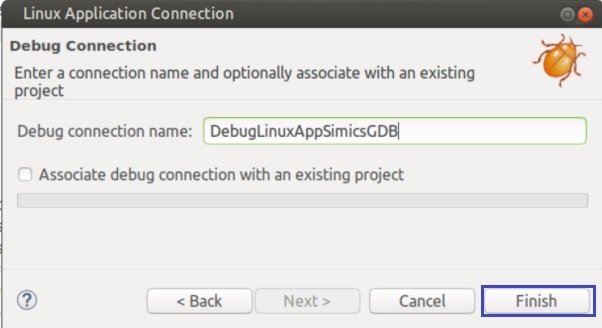 c) Edit the configuration. In the Connection tab, select:
- Linux Application Debug → Application Debug → Connections via AArch64 gdbserver → Connect to already running application
- Address: localhost (or host PC IP if want to be accessed from a different PC in the same network)
- Port: 4001
- Select Terminate gdbserver on disconnect
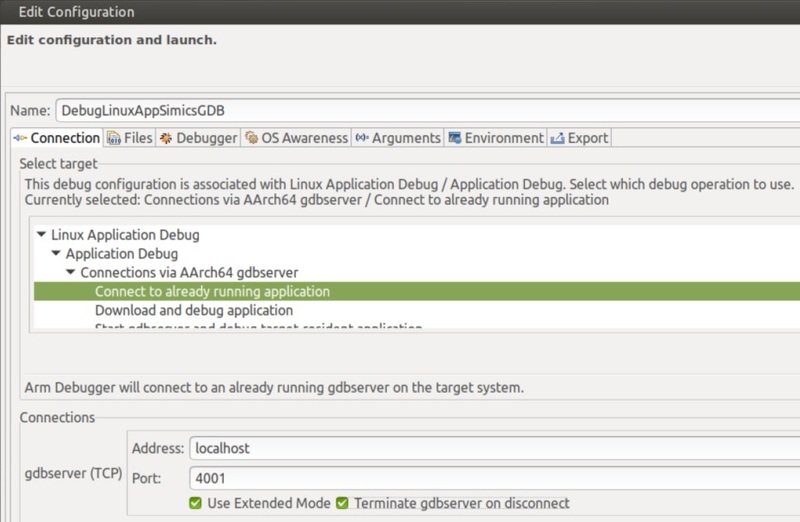 d) Edit the configuration. In Files tab, select the application binary loaded as symbol file:
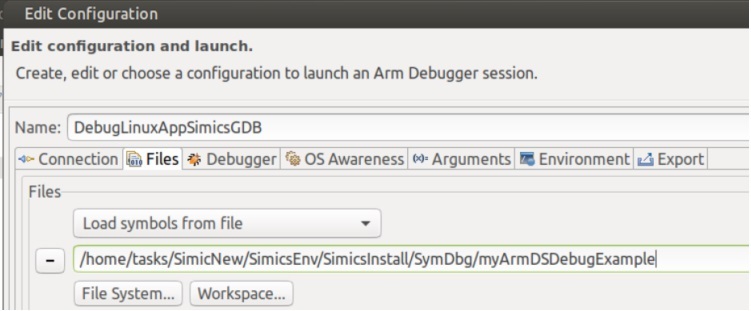 e) Edit the configuration. In Debugger tab, select Debug from symbol: main
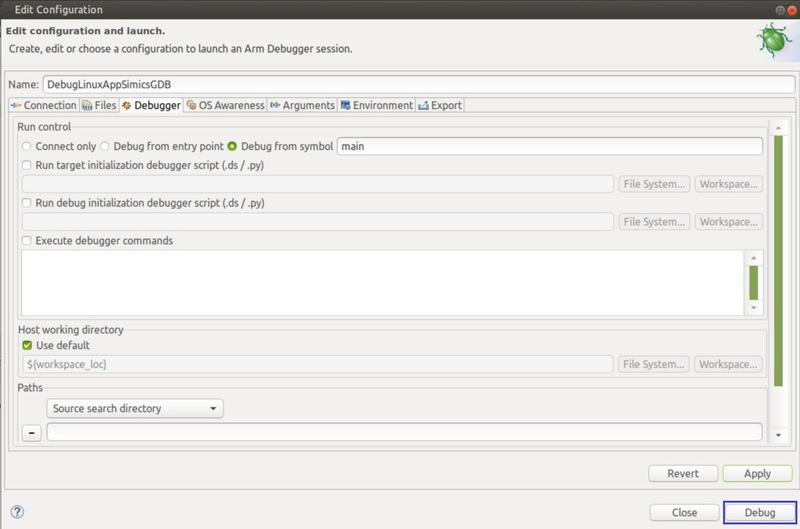 Press Debug button to start the debug.
5. The application debug can be performed now. ARM DS shows the source code of the test application stopped at the entry point of the
 main() function and we observe at the left the Debug Control panel with the options to control the execution of the code:
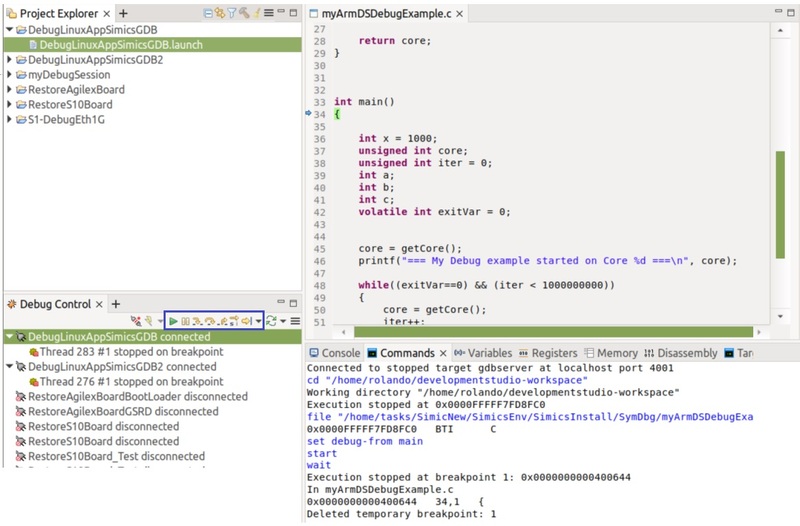 Observe that in the target serial console, the gdb server reports that the connection with the host was achieved showing the message: Remote debugging from host 10.10.0.1, port 4097
a) Run the code and after a few seconds pause it. Observe that it stops under the while loop (or under the
 getCore() function which is called under the loop). You can observe the value of the variables using the Variables tab. The iter variable is increased in every iteration in the loop and the current value of exitVar variable is 0. You can also observe that the application is being executed in core 0. The loop will exit whenever the exitVar variable has a value of 1 or the iterator reaches gets greater than 1000000000. At this point, the application already printed the === My Debug example started on Core 0 === message in the serial console.
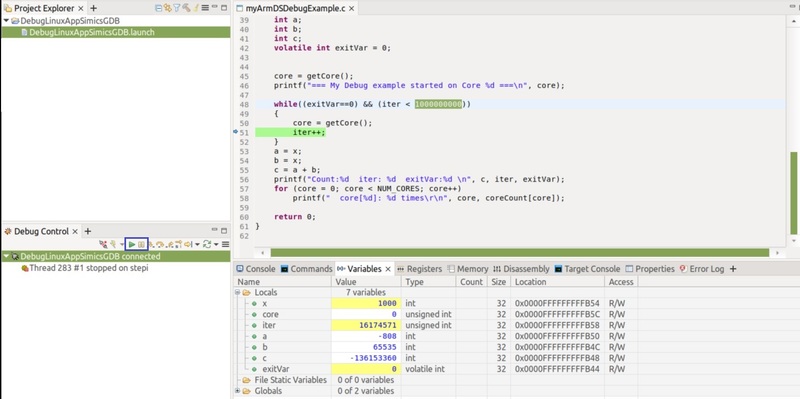 b) You can change the value of the
 exitVar variable from the Value column in the Variables tab, use the step-over button to advance in the execution of the application, and confirm that this condition makes it exit from the loop. You can continue advancing in the code execution and observe that the variables a and b gets initialized with the value of x. Observe that the c variable gets updated with the result of the addition of a and b variables.
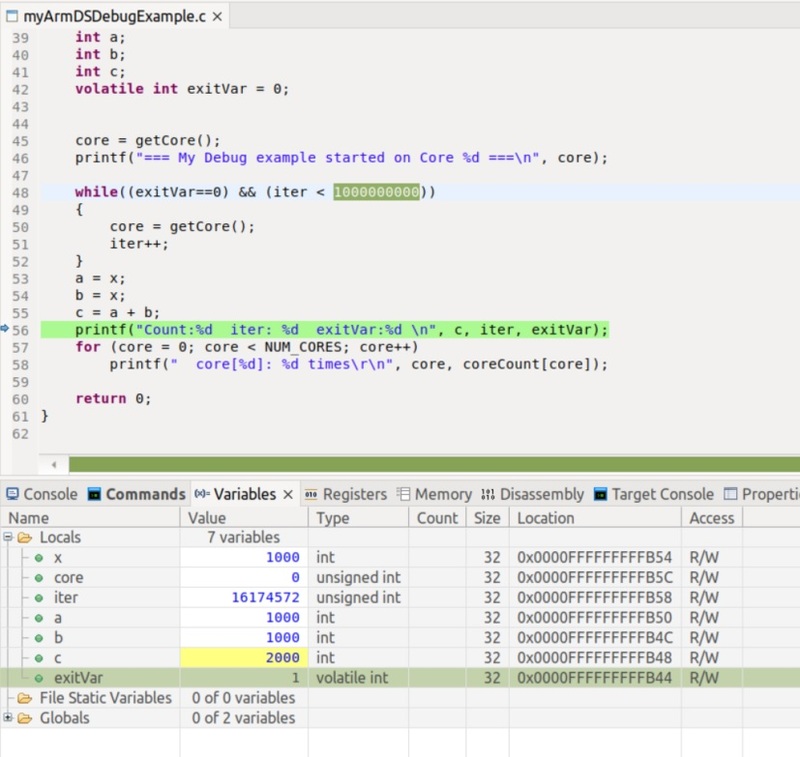 c) Proceed to continue the code execution and observe that the application gets finished printing the results. Also, you can get disconnected from the gdb server session and after this, the serial console shows again the Linux prompt.

 RocketBoards