- Home
- Documentation
- Community
- Projects
- Boards
- Agilex 5 SoC
- Agilex 7 SoC
- Arria 10 SoC
- Nallatech 385A - Arria 10 FPGA Network Accelerator Card
- Nallatech 385A-SoC Accelerator Card with Arria 10 FPGA
- ALARIC Instant DevKit ARRIA 10 SoC FMC IDK by REFLEX CES
- Altera Arria 10 SoC Virtual Platform
- Altera Arria 10 SoC Board
- Nallatech 510T compute acceleration card with Intel Arria 10 FPGA
- REFLEX CES Achilles Arria 10 SoC SOM
- Terasic Arria10 SoC Board : HAN Pilot Platform
- Arria V SoC
- Cyclone V SoC
- Altera Cyclone V SoC Board
- Arrow SoCKit User Manual - July 2017 Edition
- Arrow SoCKit User Manual - November 2019 Edition
- Arrow SoCKit Evaluation Board
- Atlas-SoC Development Platform
- Critical Link MitySOM-5CSx Development Kit
- Cyclone V Ethernet driver problems
- DE10-Nano Development Board
- Terasic DE10-Standard Development Kit
- Devboards DBM-SoC1 module
- Devboards DBM-SoC2 module
- EBV SoCrates Evaluation Board
- Enclustra Mercury SA1 SoC Module
- Enterpoint Drigmorn 5
- Enterpoint Larg 2
- Altera Cyclone V SoC Development Platform
- Mpression Helio SoC Evaluation Kit by Macnica
- Mpression Sodia Evaluation Board by Macnica
- ARIES Embedded - MCV System on Module
- Mpression Borax SOM Module and Development Kit by Macnica
- Enterpoint Mulldonoch 3
- Networked Pro-Audio FPGA SoC Development Kit by Coveloz
- NOVPEK™CVLite
- NOVSOM®CV
- NOVSOM®CVLite
- NovTech IoT Octopus™
- NovTech NetLeap™
- Enterpoint Raggedstone 4
- Solectrix SMARC compliant System-on-Module
- Terasic DE1-SoC Development and Education Board
- Stratix 10 SoC
- Find a Board
- News
Documentation
Similar topics
-
SoC FPGA Benchmarking
A guide to configuring and running benchmarks for SoC FPGAs running Linux
- Altera Cyclone V SoC Board
-
 SoC Device Resources
-
Altera Cyclone V SoC Development Platform
iW RainboW G17D Altera Cyclone V SoC Development Platform
- Altera Arria V SoC Board
Recent Changes
-
 GSRD for Agilex 7 I-Series Transceiver-SoC DevKit (4x F-Tile)
Golden System Reference Design for DK SI AGI027FB, DK SI AGI027FA and DK SI AGI027FC
 -
 Macnica Sulfur ~ Development Kit for Agilex™ 5 FPGA E-Series ~
-
 Building Bootloader for Agilex 5
Building latest bootloaders for Agilex 5 SoC Devices
 - Ashling RiscFree Examples
-
Intel® Simics® Simulator for Intel FPGAs Release Notes
This page provides release information about the Intel® Simics® simulator for Intel FPGAs.
Table of Contents
Pre-requisites
The following items will be needed in order to succesfully get started with Linux on the Altera SoC Development board:- Altera SoC Development board (include power supply and required accessories).
- Host computer running Linux
- External USB micro SD card reader (or host computer with built-in micro SD card reader). Alternatively a micro SD to SD card adapter can be used if the host PC or the reader has a SD slot bot no micro SD slot.
- 4GB (or larger) micro SD or micro SDHC card. The actual image is 2GB, but most SD cards have some amount of invalid sectors, so using a 2GB SD card might not work.
Creating SD Card
This section explains how to create the SD card necessary to boot Linux, using the SD card image available with the precompiled Linux binaries package. The steps required to create the SD card are:- Download the Linux binaries archive:
$ wget http://download.altera.com/akdlm/software/acdsinst/13.0/156/ib_installers/linux-socfpga-13.02-RC10-bin.tar.gz
- Extract the Linux SD card image from the binaries archive:
$ tar -xzf linux-socfpga-13.02-RC10-bin.tar.gz linux-socfpga-13.02-RC10-bin/sd_image.bin
- Determine the device associated with the SD card on the host by running the following command before and after inserting the card in the reader:
$ cat /proc/partitions
Let's assume it is/dev/sdx. - Use
ddutility to write the SD image to the SD card:$ sudo dd if=linux-socfpga-13.02-RC10-bin/sd_image.bin of=/dev/sdx bs=1MNote we are using sudo to be able to write to the card. - Use
syncutility to flush the changes to the SD card:$ sudo sync
Configuring Board
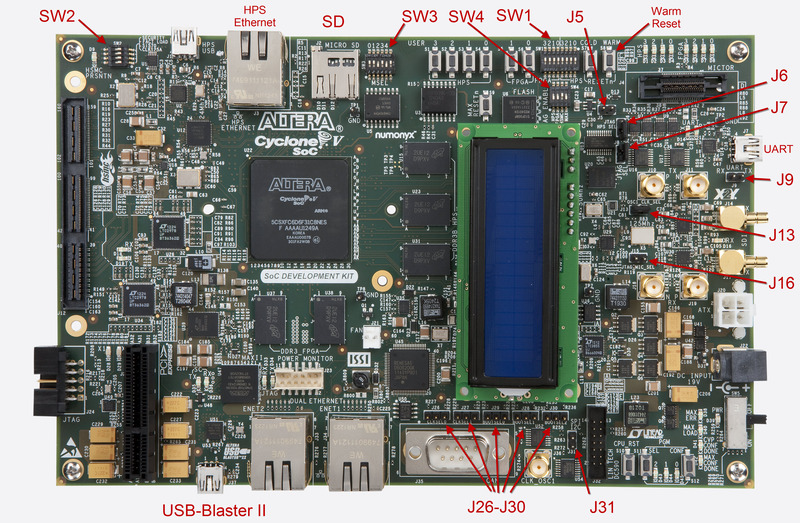
This section presents the necessary board settings in order to run Linux on the Altera SoC Development Board. The following image is provided to make it easier to find these locations on the board:
- Configure Jumpers
Jumper Setting J5 open J6 shorted J7 shorted J9 open J13 shorted J16 open J26 right shorted J27 right shorted J28 right shorted J29 right shorted J30 left shorted J31 open - Configure switches
Switch Setting SW1 All OFF SW2 All OFF SW3 1:ON-2:OFF-3:OFF-4:OFF-5:ON-6:ON SW4 1:OFF-2:OFF-3:ON-4:ON - Make sure the power switch SW5 on the board is turned OFF.
- Connect mini USB cable from the host PC to the board connector J8.
- Connect Ethernet cable from board connector J2 to the local network (hub or switch). This is needed only if networking is to be used.
- Connect 19V power supply cable to the board connector J22.
Configuring Serial Connection
The board has a built-in USB to Serial converter chip that allows the host computer to see the board as a virtual serial port, usually named/dev/ttyUSB0. Both Ubuntu 12.04 and CentsOS 6.3 have built-in drivers for the USB to Serial converter chip that is on the Altera SoC Development board, so no driver installation is necessary. In order to determine the device name associated with the virtual serial port, please perform the following:- Use the command the following command to determine which USB serial devices are already installed:
$ ls /dev/ttyUSB*
- Power up the board using the switch SW5. The board LEDs will turn on.
- Use the command command again to determine which new USB serial device appeared:
$ ls /dev/ttyUSB*
- Configure the minicom application to connect over this serial port, and use 57,600 baud, 1 stop bit, no parity, and no flow control (usually referred to as "57600-N-1")
Booting Linux
This section presents how to boot Linux on the board. The required steps are:- Prepare SD card
- Configure Board
- Configure Minicom
- Start Minicom - it will use the defined configuration
- Power up board (or, if already powered up, press S7 Warm reset button or power cycle)
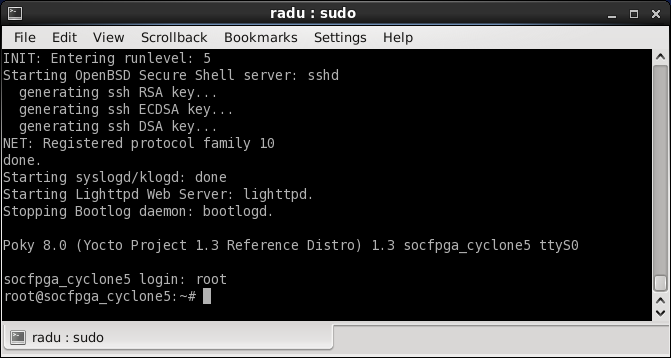
- Minicom will show Linux booting, then asking for the username. Enter
rootthen pressENTER. No password will be required.

- Configure switches
© 1999-2024 RocketBoards.org by the contributing authors. All material on this collaboration platform is the property of the contributing authors.
This website is using cookies. More info.
That's Fine
 RocketBoards